Finding a job is a serious matter! And we all know one useful social network to find your dream job – Linkedin. When I was looking for a job, I also used Linkedin. It was rather frustrating when I wasn’t having much feedback. But everything changed when I uploaded a good profile picture. I am going to explain why it is crucial to upload a high-quality photo to your Linkedin page, will give you some tips how to make it even better and will show you the best way to retouch photo and make it professional!
- Why it is important to upload a profile photo on Linkedin?
- Tips to make the best photo for your Linkedin profile
- How to save iPhone photo on PC
- What to do if the photo is blurry
- How to upload your profile photo to Linkedin
Why it is important to have a good profile photo on Linkedin?
Your Linkedin profile is the first impression you make on your possible coworkers. It’s like a job interview: you need to show all your experience and also make a good impression on the interviewer:
First Impressions Matter: A Linkedin profile without your photo can look incomplete or lacking in effort. By adding your photo, you show all Linkedin users that you are active and serious about your career.
Recognition and Trust: A profile picture allows you to be perceived as a real person and helps other users associate your name with the image of a person, and that always adds credibility.
Higher profile in Linkedin Rankings: A profile picture increases your chances of being at the top of search results, such profiles are more likely to be clicked on by recruiters. A great photo can attract the attention of someone important to you.
Networking and Building Relationships: Networking is Linkedin’s main goal, so a good photo will help you connect with people, make them want to write to you, get to know you better and find out your professional experience..
As you can see, profile picture plays an important role if you want to use Linkedin to its full potential and open new opportunities in your professional career. So where to start? With the photo itself, of course. Go for it!
Tips to make the best professional Linkedin photo
We all know that a profile picture is an important part of your Linkedin page, but here I suddenly had a problem: what kind of photo to use? Selfies, a portrait photo from a vacation or maybe a party photo with a lot of makeup on? I had no idea! If you don’t know which photo to use, let me give you some tips:
Professionalism is Key
Linkedin is a networking platform for professionals, so never use your party photos or crazy selfies. You should dress appropriately for such a photo: for example, in a business style. Pay attention to accessories, hairstyle and no-bright makeup. Perhaps the best solution is to dress as if you are going to a real job interview.Choose the Right Background
Choose a simple and neutral background so that it doesn’t distract attention away from you. No bright colors or crazy objects in the background.Focus on Good Lighting
Every photographer will explain to you how important lighting is for getting quality photos. Let’s believe them. Natural light is ideal because it creates a soft and flattering effect. Choose a location with plenty of light, such as by a window, or photograph outdoors during the golden hours of sunrise or sunset.Smile with Confidence
A smile is always the key to success. A friendly and inviting smile can do wonders for networking. A smiling person radiates warmth and openness, which is exactly what we need! Take a photo with a natural facial expression and a soft smile.Seek Objective Opinions
That’s it, the photo is ready and you think it’s perfect? I’m sure you do, but lastly, it’s better to get the opinion of people close to you. To be sure that you have chosen the right photo.Pay Attention to Image Quality
A blurry photo may not give the best impression. Make sure you use a high-resolution image that is clear, sharp and properly cropped. Avoid using heavily filtered or overly edited photos that distort your appearance. Not sure if you can do it yourself? We can help you – use Fixthephoto’s service and they’ll do all the work!
I hope these tips helped you and now you have a best photo of you for you Linkedin profile! Me too! And now we are ready to make it even better with the platform Fixthephoto! But befor this one more thing left. I’m pretty sure you made this photo on your iPhone, so first things first. Let’s save this photo (or even all your Photo Librar) on you PC and then upload it to Fixthephoto website.
How to save iPhone photo on PC
In fact, it is the easiest step in this process. Just use CopyTrans Studio – our best program for photo backups! It will help you to manage all your iPhone photos easily and copy them in a few steps. To transfer photo (or photos), you should:
- Download and install CopyTrans Studio.
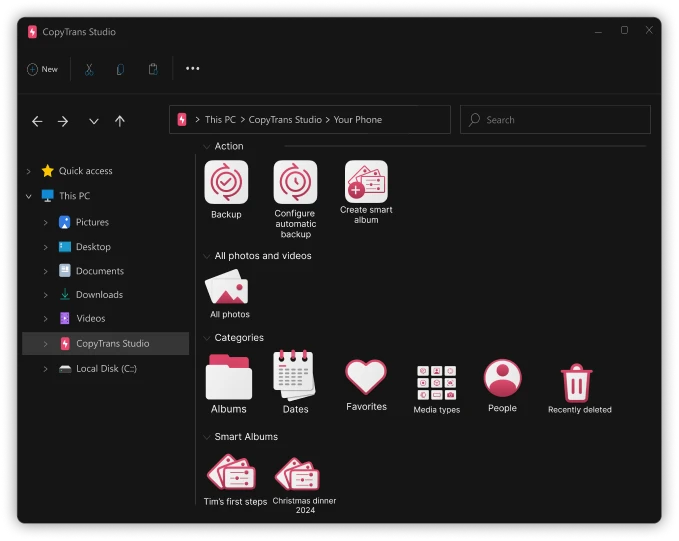
- Click on the CopyTrans Studio icon. Open the program.
- Choose your iPhone icon and then choose Photo Library.
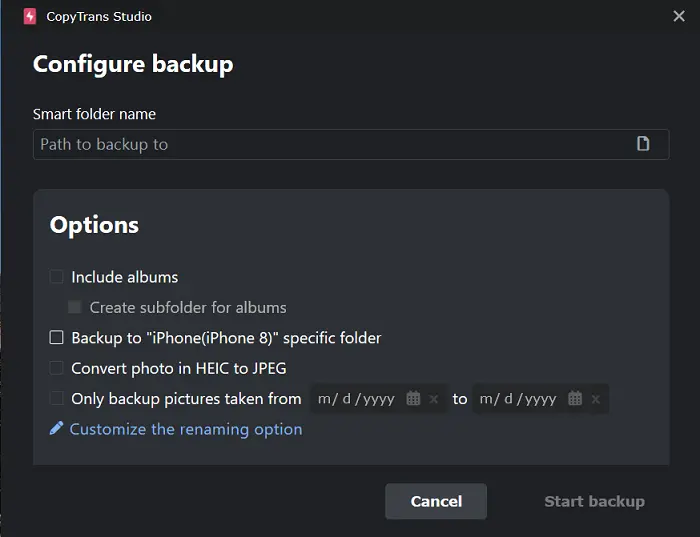
- Click on “Backup” and the Configuration Window will appear. Choose the options you need and then Start Backup.
- Or you can choose the photo you need to save. Find it in the one of the categories CopyTrans Studio offers you and just drag-and-drop it on your PC!


When you save the image on your computer, you are ready to proceed. Let’s make this photo even better!
What to do if the photo is blurry
If you are not a professional photographer, it will be pretty difficult for you to make the photo perfect, without any imperfections. But we found a best service for you that will retouche your photo and make it even more profeccional for your Linkedin profile.
What is Fixthephoto? “Fixthephoto is the most trusted agency in online photo retouching business since 2003. Simply upload photos, write your requirements, and we’ll take care of the rest.” It has a lot of options for you so you can choose what kind of editing you need, so you can use it not only for you career, but for your wedding photos, some old family pictures and so on!
How does it work?
- Open its website and create a profile. Then upload your photo.
- Explain what you expact from the photo, you can even send a referance.
- Get your photo back.
- Expet it or ask for changes, if necessary.
Sounds cool, doesn’t it? This service made my best profile picture! Now we are ready to upload it to your Loinkedin page!
How to upload your profile photo to Linkedin
The last step left! Just upload your photo to your profile and enjoy all the network has to offer.
- Log in to your Linkedin account and navigate to your profile
- Click on the “Edit Profile” button right beneath your profile picture
- Click on the camera icon in the corner of your profile photo space
- Now choose your photo from your PC and select “Upload photo”
- There will now be a preview of the uploaded image. You can adjust the position, zoom in and out, and align the photo in the provided frame. Make sure the photo is properly centered and your face is clearly visible.
- Click on the “Apply” or “Save” button to save your changes and Linkedin will upload the photo to your profile.
That is it! Now you are 100% ready to find your dream job!
Conclusion
I hope my experience that I described in this article helped you too. Now you know why it is so important to upload a picture to your profile and how to do it better! Well! I’ll let you go and wish you good luck in your search!