Capturing the world through the camera lens has always been about freezing moments in time. But what if, instead of freezing that moment, you could stretch it? Show the rush of traffic as glowing streams of light, transform a bustling waterfall into silky smoothness, or turn a chaotic city scene into a serene, dreamlike landscape? That’s the magic of long exposure photography.
This kind of creativity required expensive DSLR cameras and complicated settings before. But now, you can take stunning long exposure photos right on your iPhone. Yes, that tiny device you carry around everywhere has the power to create art that feels otherworldly. So, let’s dive into the exciting world of interesting photos and see how your iPhone can become a ticket to artistic brilliance.
In this guide, I’ll show you how to do long exposure on iPhone, some tips to make the photos perfect, and also how to save them on your PC in a few clicks.
- What is long exposure photos?
- Why take long exposure on iPhone?
- How to do long exposure photos on iPhone?
- Tips to make the photos better
- How to save long exposure photos on PC?
What is long exposure photos?
Long exposure photography is all about capturing movements over a period of time. Unlike regular photos that capture a moment instantly, long exposure shots allow the camera shutter to stay open longer, allowing light and motion to be recorded in one stunning image.
The effect can be fascinating. Think of:
- Light Trails: the hypnotic lines created by moving cars at night.
- Silky Water: waterfalls and rivers transformed into smooth, dreamy flows.
- Blurred Crowds: busy streets where people appear as soft blurs against a crisp background.
- Night Skies: capture the subtle movement of stars or even the soft glow of passing clouds.
This technique adds drama and artistic expression to ordinary scenes. And the best part? With the right settings and apps, your iPhone can do it beautifully.
Why take long exposure on iPhone?
This type of photos isn’t just a technique; it’s a way to transform ordinary scenes into something extraordinary. Here’s why it’s worth trying:
Creative Benefits
- Artistic Results: the beauty of long exposure photos lies in how they capture motion.
- Unique Perspective: it allows you to show time in a single frame, creating images that appear to be a mixture of reality and imagination.
Practical Benefits
- No Need for Expensive Equipment: forget about carrying heavy cameras and fashion lenses. Your iPhone will do this perfectly with the least effort.
- Convenience: if your iPhone is always at hand, you’ll be ready to take a unique shot when inspiration strikes.
How to do long exposure photos on iPhone?
While traditional cameras achieve long exposure by keeping the shutter open for a long time, iPhones use clever software tricks to mimic the effect. Here’s how to do it:
Using Live Photos (The Easiest Way)
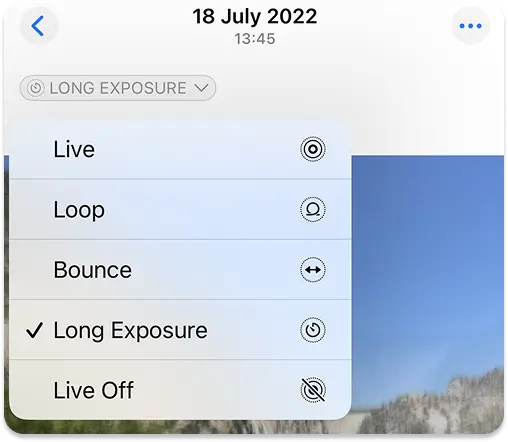
- Open the Camera app on your iPhone. Make sure Live Photos is enabled (it looks like a concentric circle icon in the top-right corner). It should be yellow when activated.
- Capture your photo by pressing the shutter button. Your iPhone will record a short clip instead of a single image.
- Open your Photos app and select the picture you just took. Swipe up on the photo to reveal effects like Loop, Bounce, and Long Exposure. Tap Long Exposure, and your iPhone will automatically blend the frames to create a dreamy, motion-blur effect.

Using Third-Party Apps (For More Control)
If you want even more control over your long exposure shots, apps like Slow Shutter Cam and Spectre Camera can help.
- Download and open the app of your choice.
- Adjust settings like shutter speed, ISO, and focus for precise results.
- Capture the photo, and let the app process the image to enhance the long exposure effect.
Long Exposure iPhone
Tips to make the photos better
Using a Tripod for Stability
What’s the number one rule when shooting with slow shutter speeds? Hold your phone steady. Even the slightest shake can turn a potentially beautiful shot into a blurry blur. It’s best to use a tripod for stability, especially when shooting at night or in low light. If you don’t have one, try placing your iPhone on a stable surface – usу a makeshift stand such as a bag or rock. The more stable your device is, the clearer the image will be.Best Lighting Conditions and Times of Day
Long exposure photos are often most vivid during the golden hour, just after sunrise or before sunset, when natural light is soft and diffused. Night photography can also produce fantastic results, especially when capturing light trails from passing cars or city lights. But be careful with overly bright light as it can lead to overexposure and loss of detail. Cloudy days are also great for creating a silky water effect, as diffused light gives your shots a mysterious atmosphere.Composition Tips for Creative Shots
Composition can make or break a photograph. When composing a photo, use leading lines, symmetry, and framing to direct the viewer’s eye. For example, when capturing waterfalls, try positioning them off-center to create a more dynamic scene. Pay attention to what is moving and what is not – the contrast of movement and stillness can produce striking results.Experimenting with Different Scenes
Long exposure photography is all about creativity. Don’t limit yourself to waterfalls and cityscapes. Try experimenting with moving crowds, crashing waves, or even clouds floating in the sky. The beauty of this technique is that it allows you to capture the passage of time, turning everyday scenes into something extraordinary.
Common Mistakes to Avoid
- Unintentional Blur from Shaky Hands: if you don’t use a tripod or have a stable surface, your long exposure shot may end up looking messy. To avoid this, always secure your iPhone before taking the photo.
- Overexposure in Bright Conditions: taking long exposure photos in bright daylight can lead to blown-out highlights and loss of detail. If you must shoot in bright conditions, consider using ND (neutral density) filters if your editing app supports them.
- Poor Composition: without careful composition, long exposure photos can end up looking flat or not interesting. Take the time to frame your shot thoughtfully, considering the elements that will enhance the overall image.
- How to Fix These Mistakes: most of the mistakes can be corrected if you edit the photo. Apps like Snapseed and Lightroom provide tools to reduce blur, adjust exposure, and refine composition. Practice makes perfect, so don’t be afraid to experiment.
How to save long exposure photos on PC?
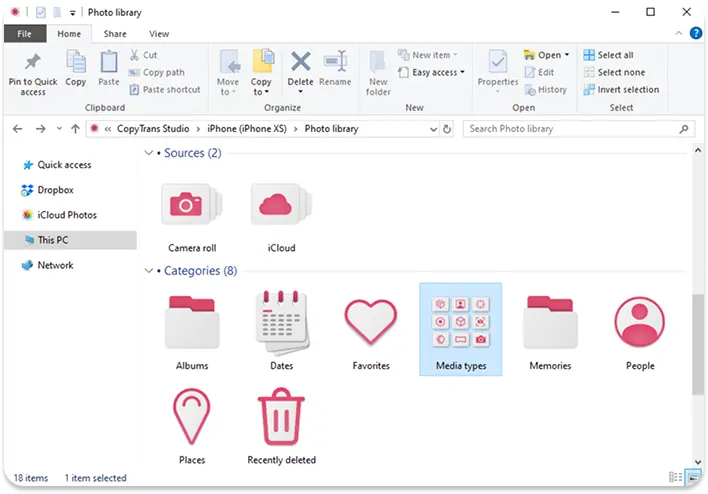
CopyTrans Studio provides an easy and reliable way to transfer and manage your photos, ensuring they are safely stored on your computer. Here’s how you can do it:
- Download and install CopyTrans Studio. Download CopyTrans Studio Now!
- Click on the CopyTrans Studio icon. Open the program.
- Now choose the device and then click on Photo Library.
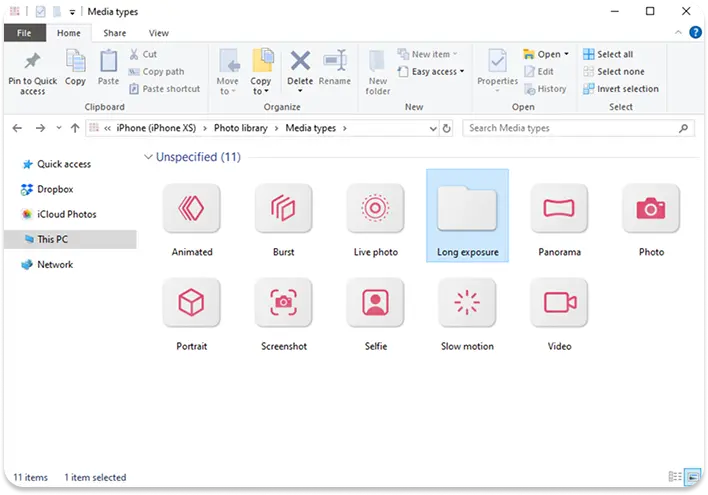
- In the main window, find the Media Types folder.
- You can now see the Long Exposure folder. You can drag and drop the whole folder to PC or only some photos of your choice.


Long Exposure Photos
FAQ
Why do my long exposure shots sometimes look flat instead of “dreamy”?
Because long exposures aren’t just about movement, they’re about the contrast between what’s moving and what’s standing still. If everything in the image is moving (trees, people, water), the effect cancels itself out. Add a fixed anchor: a rock, a building, a bridge, that’s what highlights the movement.
Does long exposure work in bright daylight without additional apps?
Yes, but timing is more important than settings. On the iPhone, long exposure in daylight works best in the early morning, late evening, or in open shade. In bright midday light, the phone shortens the exposure time to avoid overexposure which ruins the effect. Think about when, not how, first.
Why does my iPhone’s “long exposure” sometimes disappear after I take the photo?
Because it’s not a separate photo, but a Live Photo effect. If Live Photos are disabled, cropped, or removed during transfer or compression, the effect will also disappear. Always check that Live is enabled before shooting and export the photos carefully.
Do I really need a tripod, or is that just photography snobbery?
You don’t need a tripod—but you do need stability. A tripod simply ensures that stability is predictable. Leaning your smartphone against a railing, placing it on a backpack, or even holding it against your body can work surprisingly well. The rule is simple: no micro-movements while shooting.
Why does long exposure look better on water than on crowds?
Water moves in continuous, repeatable patterns, so the blur looks smooth and intentional. People move in chaotic directions, which often results in visual noise. For crowds, long exposure works best when most people are moving in the same direction—such as on stairs, escalators, or crosswalks.
Can long exposure affect image quality on the iPhone?
Only if you overdo it blindly. Long exposure involves superimposing multiple images, which can blur details and amplify digital artifacts in low light conditions. The trick is to keep the ISO sensitivity low by adding more light or shooting earlier rather than later. Clean blur is always better than noisy drama.
How to use long exposure on iPhone?
Final thoughts
Long exposure photos is a magical way to turn everyday scenes into captivating art. And the best part? You can do it all from your iPhone. Whether you’re a complete beginner or a photo enthusiast looking to expand your creative toolkit, experimenting with long exposure photos can be incredibly rewarding.
This technique isn’t just about taking pictures; it’s about creating stories within a single frame. From the glowing trails of city traffic to the peaceful blur of ocean waves, your iPhone holds the power to transform ordinary scenes into artistic masterpieces. And you don’t need expensive equipment or years of experience to do it.
And remember, your creative shots deserve to be kept safe. With CopyTrans Studio, you can easily back up and manage all your beautiful photos on your computer. So, go ahead, unleash your creativity, capture the magic of motion, and let your iPhone work its wonders. Your next masterpiece can be just one long exposure away. Happy shooting!