One day, I needed to explain several iPhone features to my parents, and I quickly realized that describing the steps in words wasn’t very helpful. The simplest solution was to screen record on iPhone and show them everything in real time. That’s when I discovered that recording your iPhone screen isn’t difficult, but it’s not always obvious if you’ve never done it before.
It took me a while to figure out how to do screen recording on iPhone correctly, with the right settings and without missing any important details. Now that I know what really works, I can save you time. In this article, I’ll show you how to screen record on iPhone step-by-step, share some practical tips for getting clean recordings, and, as a bonus, explain how to save screen recordings to your computer for easy sharing or backup.
- Why to record a screen of your iPhone
- How to Turn on Screen Record on iPhone
- How to Record Screen on iPhone
- How to Screen Record with Sound on iPhone
- Transfer Screen Records from iPhone to PC
- How to record video on iPhone: FAQ
Screen record iPhone
Why to record a screen of your iPhone
Screen recording on the iPhone gives you different opportunities for creativity, communication, and productivity. If you are a content creator, teacher, entrepreneur, or someone with a passion for technology, the screen recording feature on your iPhone can open up new possibilities for you.
So, why to screen record your iPhone?
- Making Tutorials: if you want to create educational and instructional content, then a screen recording feature has some benefits and allows you to make a step-by-step tutorial, or share tips and tricks effectively.
- Create Content: screen recording on iPhone allows you to create dynamic, engaging content that is more interesting than static images or text. This visual medium not only helps viewers understand the content but also makes it more interactive and compelling.
- Documenting Digital Experiences: say goodbye to boring emails and long meetings – you can now show your ideas and give feedback.
Now it’s time to show how to turn the screen record function on.
How to turn on screen record on iPhone
Before you start recording your iPhone screen, you need to make sure that the Screen Recording feature is available in Control Center. Apple doesn’t always add it there by default, so you’ll need to do a quick setup. Once it’s enabled, you can start recording your screen with just a couple of taps.
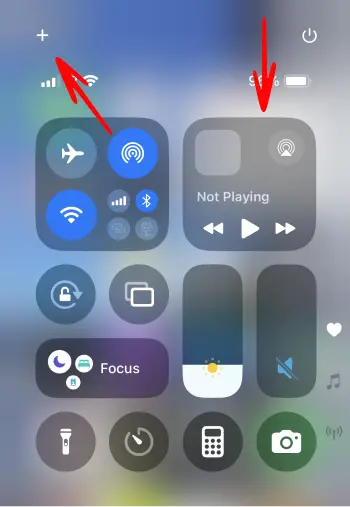
- Open the Control Center on your iPhone (slide down the right corner of the screen). Tap “+” sign to customize it
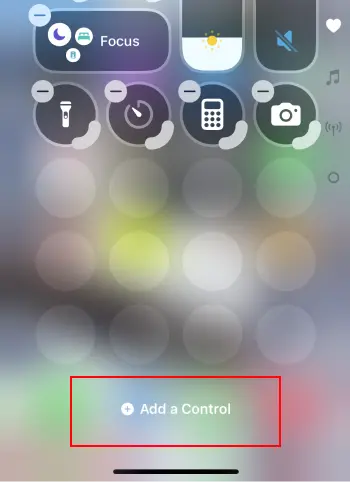
- Choose the “Add a control” option
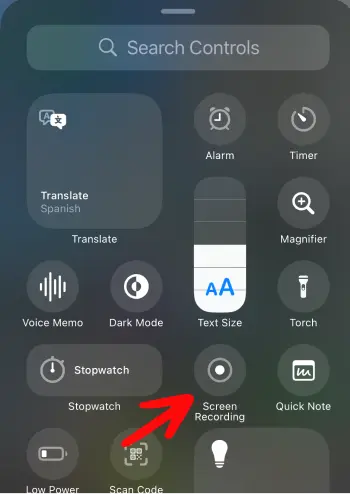
- Add “Screen Recording”
That is it. Quick access to this function was added to the Control Center. Keep reading to learn how to screen record on iPhone.
How to record screen on iPhone
After adding the Screen Recording feature to Control Center, it only takes a few seconds to start recording. The process is simple and the same for most iPhone models, so you can follow these steps whenever you need to capture what’s happening on your screen.
- Unlock your iPhone and open the Control Center
- Find the screen record icon and tap on it. The recording will start.
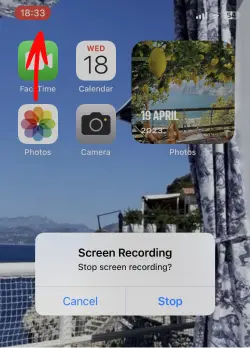
- After you finish all the actions, tap the red status bar at the top of the screen and select “Stop”. The recording will be saved in the Camera Roll.
How to screen record with sound on iPhone
If you want your screen recording to include voice commentary or background sounds, you need to turn on the sound before you start recording. This is especially useful for tutorials, step-by-step instructions.
- By default, screen recording on iPhone does not capture ambient sounds. To record with sound, long-press or 3D Touch the Screen Recording button in the Control Center.
- A menu will appear with an option to turn on the microphone. Tap on the microphone icon to enable audio recording.
- Now start the record. And after you finish, turn off the screen record by taping on the red status bar.

NOTE: the microphone will be on until you disable it the way you turned it on.
Transfer screen records from iPhone to PC
All the records are saved in your Camera Roll on your iPhone. But what if you need to download them to a PC? Then, you can use CopyTrans Studio – the easiest way to manage iPhone media files. Make a few clicks, and the videos will be saved in the folder of your choice.
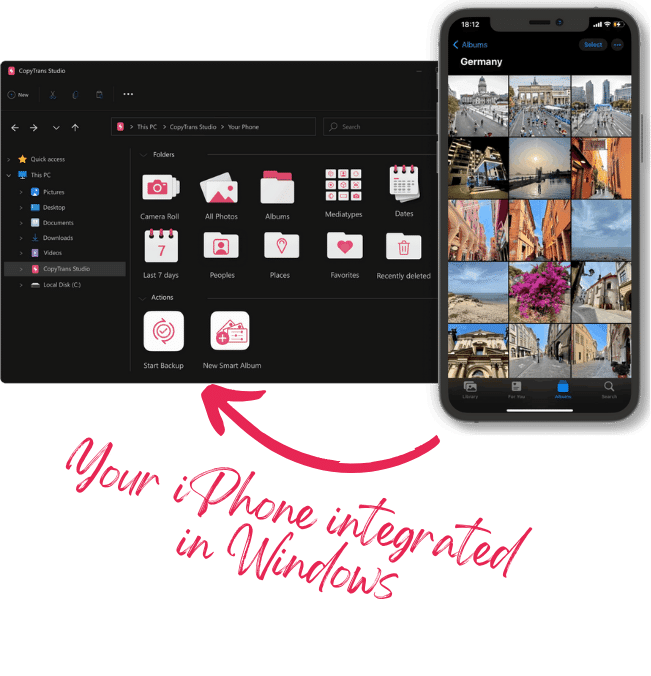
With CopyTrans Studio, you can:
- Transfer photos and videos in one click
- Access your iPhone and iPad Photos as if they were stored on a flash drive
- Organize your photos with Smart Albums
- Set up automatic backups
- Download and install CopyTrans Studio
- Click on the CopyTrans Studio icon. Open the program.
- Now choose the Photo Library of your iPhone
- In the main Window, go to the Media Types folder and then select the video folder
- Now drag and drop the records to your PC


If you need to edit an iPhone video, use this guide.
How to record video on iPhone
FAQ
What is the screen recording feature on iPhone?
The screen recording feature on your iPhone lets you capture everything happening on your iPhone screen. It’s super handy for making tutorials, sharing gameplay, or just saving something funny you see on the Internet. It’s a built-in screen recorder that allows you to record your iPhone screen in real time without any extra apps.
Can I record the screen on an iPad?
Absolutely! The process is the same for both iPhone or iPad. Just make sure your iPad is running iOS 11 or later, and follow the same steps to add the screen recording feature to the Control Center. Then, you can easily record your iPad screen, just like you would do it on an iPhone.
Can I screen record on older iPhone models?
Yep! As long as your device is running iOS 11 or later, you can screen record on older iPhone models too. Just make sure to follow the steps to enable the screen recording feature we just talked about. Once it’s done, you can easily record your iPhone screen, no matter which model you’ve got!
How to add screen record on iPhone
Final Thought
Now that you know how to record iPhone screen, the possibilities are endless. Whether you’re walking someone through a tutorial, capturing a funny moment from an app, or saving a bug to report later, screen recording is one of those features you don’t realize you need until you try it.
And if you’re using the latest model, the iPhone 16 screen recording process is just as easy, with the added bonus of improved performance and audio synchronization. You can even record with external audio if you want to explain what’s happening on screen as you go along perfect for sharing tips or quick reviews with friends or subscribers.
In short, mastering screen recording on iPhone is not only useful, but also a lot of fun. So give it a try, and see how easily you can turn what’s happening on your screen into a video that you can save, share, or revisit at any time.