I’ve recently learned that Apple added one great feature a while ago – Shared Albums. I have only heard about it in passing, but I got curious and started exploring the topic. The deeper I got into it, the more interesting it became. I am now fully aware of the feature and ready to answer the following questions:
- What is Shared Albums and what is it for?
- How to use this feature and organize iPhone photos?
- How to see Shared Albums on iPhone?
- How to share photos with friends or family members?
- How to save photos from Shared Albums to PC?
- How to fix issues with Shred Albums?
If this is what you want to know, then you have chosen the right article!
- Shared Albums iPhone
- How to turn off Shared Photos and how to turn it on
- How to find Shared Albums
- How to save photos from shared album on iPhone
- How to save Shared Albums on PC
- Shared Albums not working: how to fix
Shared Albums iPhone
Shared Albums in the Photos app on iPhone is a game-changer. The feature makes it possible to stay in touch with other Apple users and share special moments. You can create collaborative albums that are easy to manage and perfect for keeping everyone in the loop. No more need to post pictures of a family gathering, vacation, wedding, or even a work event on social media or send them via messengers.
How It Works
With Shared Albums, you can set up an album right in the Photos app that is synced via iCloud. This isn’t just about uploading pictures, it’s an interactive experience. The participants can leave comments, hit the like button, and share their own photos or videos directly to the album. It’s almost like having your own private photo-sharing network!
What’s one of the coolest aspects? It’s real-time sharing. Imagine you’re on a trip or at an event — upload photos as you take them, and everyone you invited can see them instantly. It’s a great way to keep everyone connected, even if they’re miles away.
Why is it better than social media? Unlike other platforms for photo-sharing like Instagram or Facebook, Shared Albums prioritizes privacy. It’s perfect for moments you want to share with a select group – whether They are baby photos, team projects, or a sneak peek at your latest creative endeavor.
Sounds great! The feature has its pros and cons:
PROS:
- Easy to set up and use.
- You can invite up to 100 people.
- Doesn’t take up space in iCloud.
CONS:
- Photo quality degrades
- Videos are limited (maximum 15 minutes, 720p).
Anyway, it’s worth checking how it works and what functions it has.
How to turn on Shared Albums
Shared Albums is very easy to use. It is intuitive and has a user-friendly interface. Before you start, make sure that you know how to turn on Shared Albums.
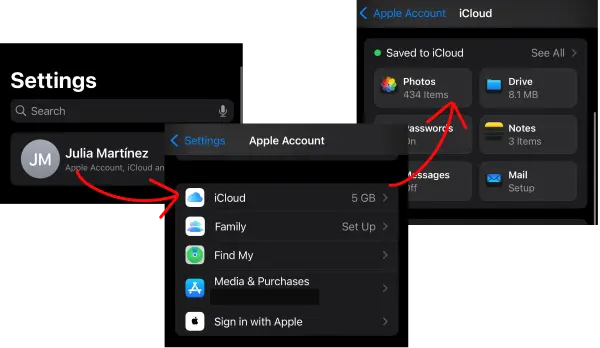
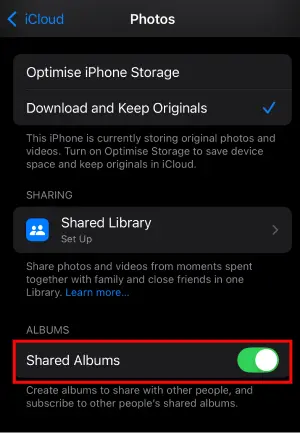
- In the Settings, tap on your name. Choose iCloud > Photos
- Check that the Shared Album function is activated
- Now you’re ready to organize your photos
If you don’t want to use Shared Albums, just disable it by following the steps above.
How to find Shared Albums
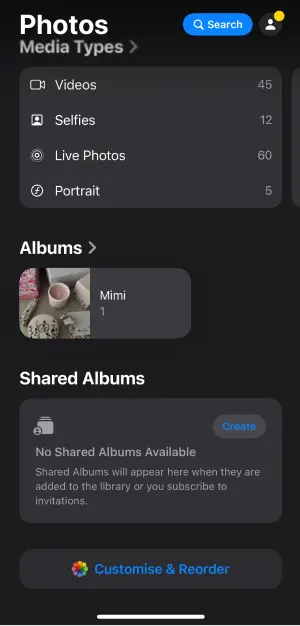
Let’s start with how to create the album and organize the photos.
- Open the Photos app and scroll down to the Shared Albums tab. Tap on Create
- Add information: Name of the Album, Invite people. Now choose Add Photos and select the photos from your Camera Roll
- Tap on Create
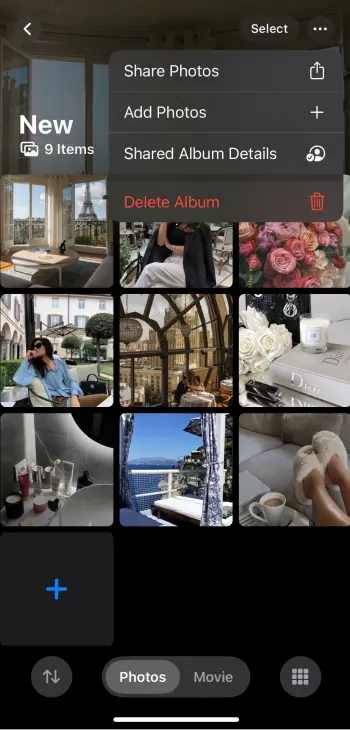
- You can add more photos, delete photos from the album or delete the whole album
- You can also check the Shared Albums Details to rename the album, invite more people or make it public

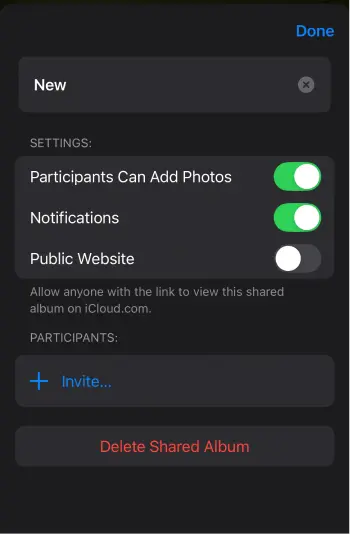
That is such an easy and effective way to exchange photos and share the memories between different iOS users. But what to do if you want to save these photos to your PC? Keep reading to find the best solution.
How to save photos from shared album iPhone
At some point, simply viewing photos is not enough. You may want to save a few photos from a family album, preserve memories of a trip, or ensure that important images are not lost if the album is deleted. Saving photos from a shared album on your iPhone is very easy.
If you have access to a shared album, you can save individual photos directly to your library. Here’s how it works:
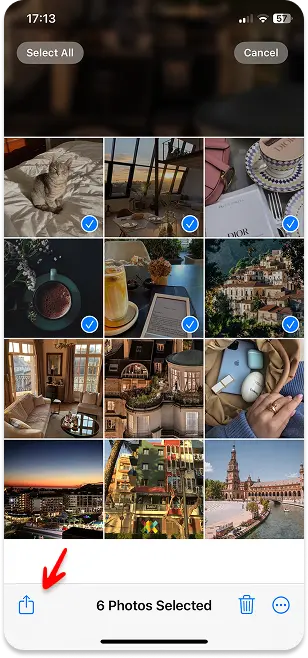
Open the Photos app on your iPhone. Go to the Shared Albums tab.
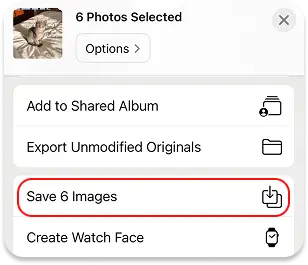
Open the album you want. Tap the photo you want to save. Tap the Share icon.
Now select Save Image. The photo will then appear in your Camera Roll, just like any other image you have taken yourself.

A quick reminder…
Saved photos become independent copies in your library. If the owner later deletes the photo from the shared album, your saved version will remain on your iPhone. However, photos in shared albums may be compressed, so if you need the original quality, it’s worth asking the owner to share the files in another way.
Shared albums are a great way to stay connected, but knowing how to save important moments ensures that your favourite moments are always at your fingertips.
How to save Shared Albums on PC
“Save shared iCloud photos on your PC” – it sounds like something impossible or very difficult to do. But that is not true. I can offer you an easy solution – CopyTrans Studio.
- Download and install CopyTrans Studio Download CopyTrans Studio
- Click on the CopyTrans Studio icon. Open the program.
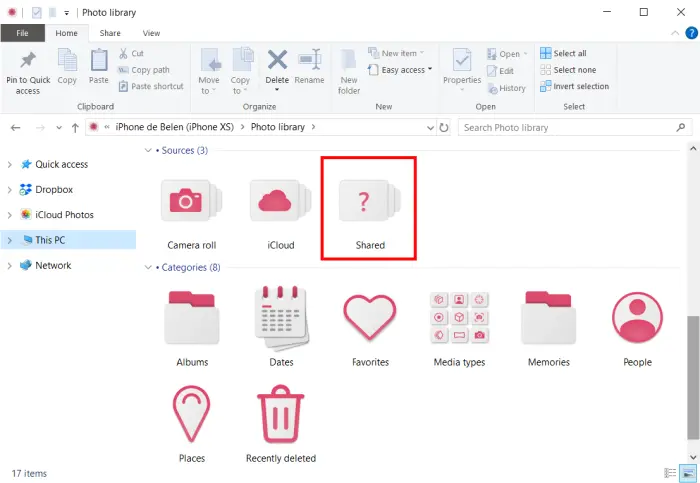
- Select your iPhone and click on “Photo Library”.
- In the main window of the program, find Shared.
- Now you are ready to drag-and-drop the photos you need.


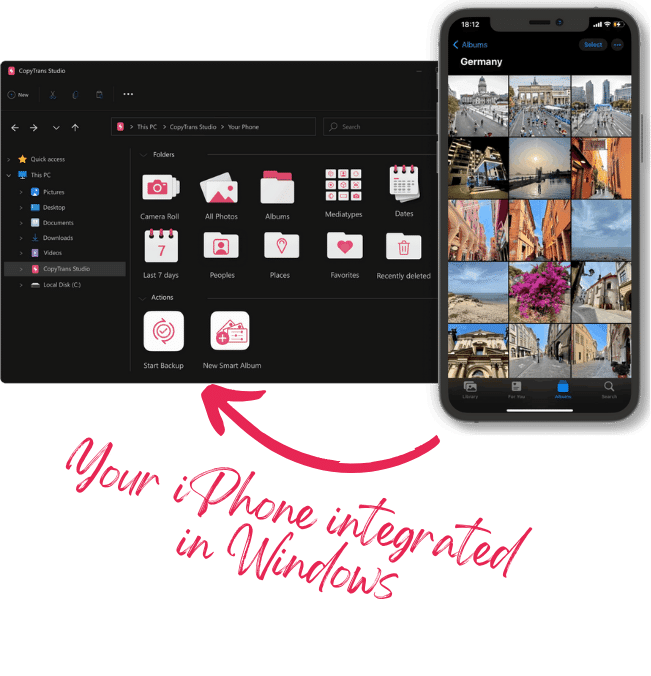
With CopyTrans Studio, you can:
- Transfer photos and videos in one click
- Access your iPhone and iPad Photos as if they were stored on a flash drive
- View iPhone photos and videos without conversion
- Say goodbye to HEIC photos and convert them to JPEG
- Connect iPhone to PC via Wi-Fi
Shared Albums not working
How to fix
Shared Albums is a convenient way to share photos, but different problems can sometimes arise. I will now tell you the reasons and solutions to the problems:
Common Problems with Shared Albums
- Unable to View Shared Album: Shared album invitations are not received or cannot be opened correctly.
- Photos Not Uploading or Syncing:Added photos do not appear in the shared album for the others.
- Shared Album Not Loading: Albums are blank or fail to load on certain devices.
Solutions to Fix Shared Album Issues
- Check Internet Connection: Shared albums require a stable internet connection to function correctly.
– Wi-Fi Issues: Make sure your device is connected to a reliable Wi-Fi network.
– Mobile Data Settings: If you’re using cellular data, check that your device allows photo uploads via mobile data. - Enable Shared Album Feature: The shared album feature must be turned on for both the sender and receiver. Go to Settings > Photos > Shared Albums and toggle it on.
- Accept the Invitation Again: If you’re unable to view a shared album, then ask the sender to resend the invitation, or make sure you’re signed in with the correct Apple ID.
- Update Your Devices: Outdated software version can lead to compatibility issues.
- Log Out and Back Into iCloud: Refreshing your iCloud session can resolve syncing problems. Log out of iCloud: Settings > Your Name > Sign Out. Then restart your device and log back into iCloud.
- Check Album Permissions: Make sure the shared album permissions allow contributors to add photos. Open the shared album, tap the People tab, and check the settings.
- Disable and Re-enable Shared Albums: Sometimes toggling the feature off and on can fix glitches. Turn off Shared Albums: Settings > Photos > Shared Albums. Then restart your device, then re-enable Shared Albums.
Shared Albums
Conclusion
Shared Albums on iPhone is such a handy way to keep your photos and videos organized and share them with friends and family. Whether you wish to know how to see shared albums or you just want to find an easy way to share memories, this feature makes it super simple. Plus, it’s private, and you can manage access.
The best part is that you can see your shared albums on any Apple device. So, your favorite photos are always just a tap away. And you also have a great opportunity to save these shared photos to your PC with CopyTrans Studio!
If you’re having troubles using shared albums or you simply can’t find them, don’t stress! A quick check of your Internet connection or iCloud settings usually fixes it. Shared Albums make it easy to stay connected and share special moments with the people who matter most.