I’m not a proffecional photographer, that’s why I often take photos and then realize that something in the background is ruining the shot. A stranger walking by, a messy corner, or just too many details behind the subject. And sometimes I just want to share a photo without showing all the small details. So, I decided to learn how to blur photos on iPhone. It’s one of those little editing tricks that can completely change the look of your photo, making it cleaner, more focused, or a little more private.
And the best part? You don’t need Photoshop or any fancy skills. In this article, I’ll show you how to easily blur photos on your iPhone, whether it’s to soften the background, hide someone’s face, or give your shots a more professional look — all with just a few taps.
How to blur a picture on iPhone
using Portrait mode
If you want to achieve the soft, professional background blur often seen in portraits, your iPhone already has a built-in feature for this. It’s called Portrait Mode, and it’s designed to highlight your subject while softly blurring everything else. Here’s how to do it:
Open the Camera app on your iPhone.
Swipe through the shooting modes at the bottom until you find Portrait.
Make sure your subject is clearly visible and well lit, you’ll see a yellow box when the camera detects a face or object in focus.
When the background starts to blur in the preview, press the shutter button to take the photo.
That’s it! Your photo will automatically have a beautiful blurred background effect.
But there’s a little bonus that many people don’t know about: you can adjust the blur level after shooting.
Just open the photo in the Photos app, tap Edit, and then tap the f-number (f/) icon in the upper corner. Drag the slider — smaller numbers mean more blur, larger numbers mean less.
Tip: Portrait Mode works best when the subject is about two meters away and there is enough space behind them—the greater the distance, the smoother the blur will be.
How to save blured photos on iPhone
And never forget to save these photos on your PC, as the basic rule of the digital world is “Always have a copy”! With CopyTrans Studio, you can back up editid photos.
- Download and install CopyTrans Studio. Download CopyTrans Studio
- Click on the CopyTrans Studio icon. Open the program.
- Choose your iPhone and Photo Library
- Now you can see different options to back up your photos
- Find blured photos and drag-and-drop them to your PC.


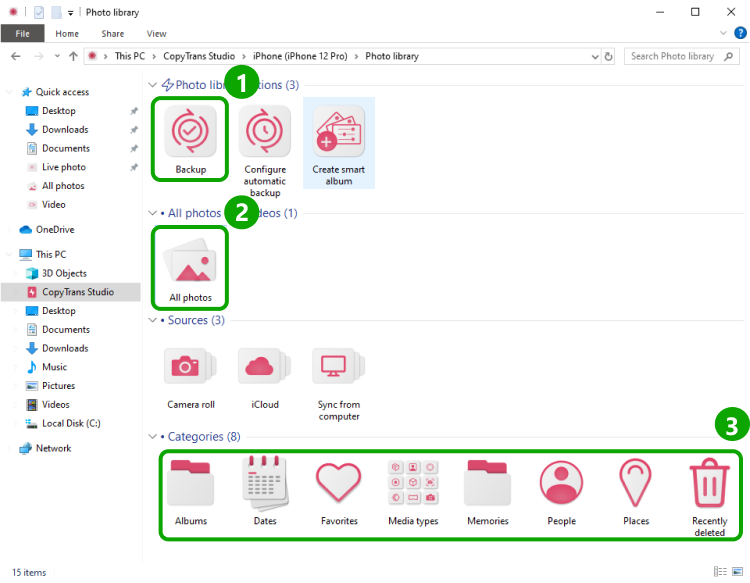
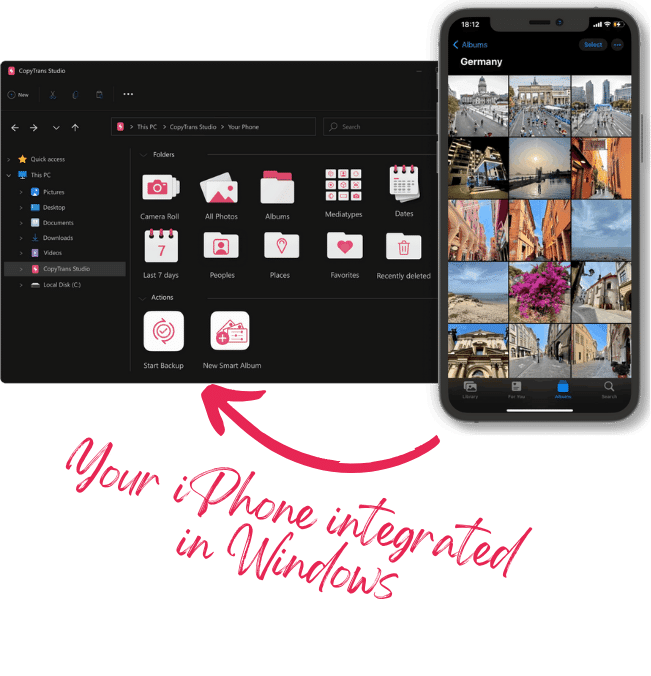
With CopyTrans Studio, you can:
- Transfer photos and videos in one click
- Access your iPad Photos as if they were stored on a flash drive
- View videos directly from iPhone with CopyTrans Viewer
- Connect iPhone to PC via Wi-Fi
Blur iPhone Photos
FAQ
1. Why does blurring look different on my iPhone than on my friend’s phone?
Because not all iPhones process depth in the same way. Newer models (such as the iPhone 13 and later) use improved sensors and software that more accurately separate the subject from the background. On older devices, the blur may appear softer or less precise—it’s not your fault, it’s just that different hardware works differently.
2. Can I blur a photo that wasn’t taken in Portrait mode?
Yes, but using third-party apps.
3. Why does Portrait mode sometimes refuse to blur the background?
This usually happens when the iPhone can’t clearly identify the subject or there isn’t enough distance between the subject and the background. Try stepping back a little, making sure the lighting is even and the subject stands out from the background. Once the iPhone locks focus (you’ll see a yellow box), the blur will appear automatically.
4. Is it possible to blur only one person in a group photo?
It is not possible to do this with the built-in tools—Portrait mode applies blurring to the entire background. However, you can use the third-party tool to manually cover a person’s face or part of the image. This is a simple way to protect someone’s privacy in a group photo.
5. Is there a way to remove blur after taking a photo?
Yes, if the photo was taken in Portrait mode. Open the photo, tap Edit, and move the depth effect (the small f/ icon) to the extreme position to reduce or remove blur. You can even turn off Portrait mode completely by tapping Portrait → Natural Lighting and selecting a regular lighting style.
Blur Photos
Final Thoughts
As it turns out, you don’t need any extra apps to blur photos on your iPhone — everything you need is already built into the device. Portrait mode helps you instantly soften the background and highlight your subject, while the Photos app lets you adjust the blur later or quickly hide small details with simple tools.
If you want to give your photos a professional look or hide certain details, these built-in features let you do so with minimal effort. Just a few taps, a quick adjustment, and your photo looks cleaner, more focused, and ready to share. Sometimes the simplest tools really do work best.