There’s something oddly satisfying about a clean photo library. No endless scrolling, no blurry duplicates, no accidental screenshots of your lock screen at 3 AM. But somehow, deleting photos on an iPhone isn’t always as simple as it sounds. Ever deleted a photo, only to see it still hanging around somewhere? Or struggled to clear space because your storage is mysteriously still full?
I’ve been there too. Over time, my iPhone Camera Roll became a mix of everything: work screenshots, random memes, receipts I forgot to delete, and, of course, way too many photos of my cat. So, I decided to finally clean things up and figure out the easiest (and fastest) ways to delete photos on iPhone for good.
In this guide, I’ll show you exactly how to remove photos from your iPhone, whether you just want to free up some space or do a full cleanup. Let’s dive in!
- Why delete photos on iPhone?
- How to delete photos from iPhone
- How to permanently delete photos from iPhone: FAQ
Delete photos from iPhone
Before we get into the how, let’s quickly cover the why and how often to delete photos.
Why delete photos?
- Free up storage – Photos, especially high-quality ones, can eat up space fast. Clearing out unnecessary images can help your iPhone to keep running smoothly.
- Stay organized – A cluttered photo library makes it harder to find the pictures that actually matter.
- Avoid unnecessary backups– The more photos you keep, the longer and heavier your iCloud or local backups become.
- Improve performance – If your storage is nearly full, your iPhone may slow down or struggle with updates.
How often should you clean up?
- Every few weeks – If you take lots of photos, a quick cleanup every two weeks will prevent the mess from piling up.
- Once a month – A deeper cleanup, especially for old screenshots, duplicates, and accidental photos, can keep things in check.
- When storage runs low – If your iPhone warns you about space, it’s time for a serious decluttering session.
Now it’s time to look at the most effective ways to delete photos from your iPhone, whether you’re deleting a few photos or clearing your entire library at once.
How to delete photos from iPhone
Once you’ve determined how often you need to clean up your library, the next step is to delete those photos from your device. Deleting photos directly on your iPhone is a quick way to do small tasks, but it can be challenging for large cleanups, and scrolling through thousands of images on a small screen isn’t much fun.
That’s why I suggest you CopyTrans Studio. It allows you to manage photos on your iPhone and delete them directly from your computer, making the whole process faster, clearer, and much more comfortable. Whether you’re deleting a few images or doing a complete cleanup, everything remains simple.
So, let’s dive into the steps for CopyTrans Studio to make your iPhone Photo Library organized in no time!
More detailed guide on how to organize photos on iPhone.
Download and install CopyTrans Studio.
Download CopyTrans Studio- Click on the CopyTrans Studio icon. Open the program.
Now choose the device and then click on Photo Library.
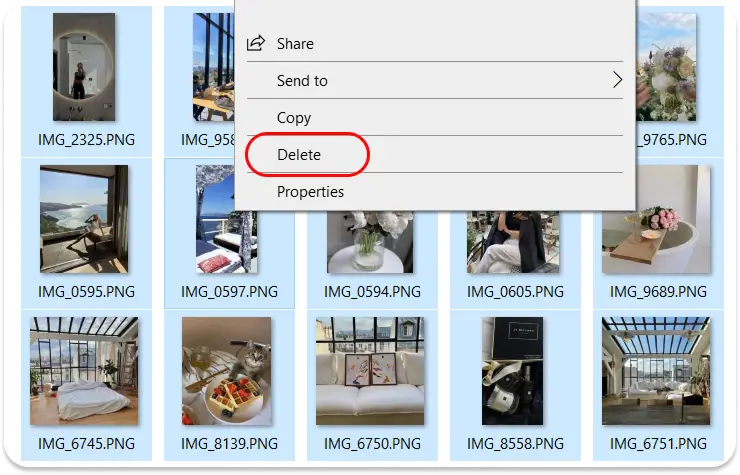
In the main window, open a folder or an album you wish to delete photos from. Now, select the photos and right-click on them.
That’s how to delete all photos on iPhone, multiple photos or the whole albums.


How to permanently delete photos from iPhone
FAQ
1. Why do my deleted photos keep coming back on my iPhone?
If your deleted photos keep reappearing, it’s likely because of iCloud Photos. When iCloud Photos is enabled, deleting a photo on your iPhone should remove it from all synced devices. However, if your internet connection is unstable or if the photo is still present on another device, it may re-sync. Try disabling and re-enabling iCloud Photos under Settings > Your Name > iCloud > Photos on your iPhone to refresh the sync.
2. How do I permanently delete photos from my iPhone?
When you delete a photo, it moves to the Recently Deleted album, where it stays for 30 days before being permanently erased. To delete it immediately, go to Photos > Albums > Recently Deleted, select the photos, and tap Delete Permanently.
3. Can I delete all photos from my iPhone at once?
Yes! The fastest way is to go to the Photos app, tap Library, then All Photos. Tap Select in the top right corner, drag your finger down to select multiple images, and tap the trash icon. For a complete wipe, also empty the Recently Deleted folder.
4. Why is my storage still full after deleting photos?
Even after deleting photos, they stay in the Recently Deleted album for 30 days, still taking up storage. To free up space instantly, go to Photos > Albums > Recently Deleted and remove them permanently. If your storage is still full, check Settings > General > iPhone Storage to see what else is using space.
5. How can I delete photos only from my iPhone but keep them in iCloud?
If you use iCloud Photos, a photo deleted on your iPhone is also removed from iCloud. To delete photos only from your iPhone while keeping them in iCloud, you need to disable iCloud Photos first (Settings > Your Name > iCloud > Photos > Turn Off iCloud Photos), then delete the photos from your device.
6. Can I recover photos after deleting them from Recently Deleted?
Unfortunately, once you delete photos from the Recently Deleted album, they’re gone for good. The only way to recover them is to restore a backup. Check if you have an iCloud or iTunes backup that includes the deleted photos and restore it on your device.
How to delete multiple photos on iPhone
Final Thoughts
Cleaning up your iPhone photo library might not be the most exciting task, but it’s one of those little things that makes life easier. No more endless scrolling to find that one photo, no more annoying storage warnings, and no more backup delays because of thousands of forgotten screenshots.
I get it, it can be exhausting to figure out how to delete photos on iPhone, especially if you’ve been hoarding them for years. But it can make a huge difference if you do it regularly, even in small steps. And the best part? Your iPhone will feel lighter, faster, and way more organized.
So whether you just did a quick cleanup or finally tackled years of photo chaos, give yourself a little credit. You’re one step closer to a clutter-free Camera Roll!