You take a photo. The moment is captured, but the shot isn’t quite right. Maybe the colors are too dull. Maybe the framing is off. Or maybe you just need to tweak the photo a little to make it look more like yours…
I tested the built-in editing tools on the iPhone — no apps, no additional downloads — and they are more functional than they seem. If you’re wondering how to edit photos on your iPhone without wasting time or compromising quality, this guide will help you do just that.
Let me show you what you can do with just the Photos app and how to get the most out of it.
- How to crop photos on iPhone?
- Add stickers to photos iPhone
- How to add text to photos on iPhone?
- How to resize photos on iPhone without cropping?
- How to save edited photos on iPhone?
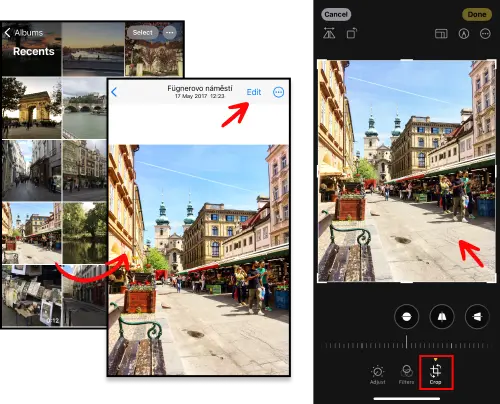
How to crop photos on iPhone
If you want to cut off part of a photo, then you can have to use the crop function in Photo App. It will help you to crop the edges of your photos to focus on the main object or enhance the composition. To crop a photo on your iPhone:
- Open the Photos App and select the photo you want to edit
- Tap “Edit” in the top right corner, and then the crop icon
- Adjust the cropping frame by dragging the corners or the sides of the frames
- Click on “Done” to save changes
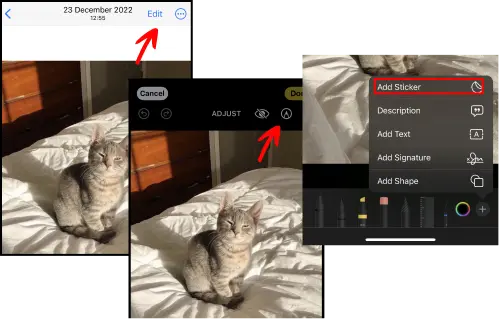
Add stickers to photos iPhone
Sometimes we just need to make our photos funnier! You can simply add a sticker, and it will make the photo more fun.
- In the Photos App, select a photo and tap “Edit”
- Click on the Pencil icon
- Then tap + and choose the option “Add Sticker”
- Here you can see different options, select the one you need
- Don’t forget to choose “Done” at the end
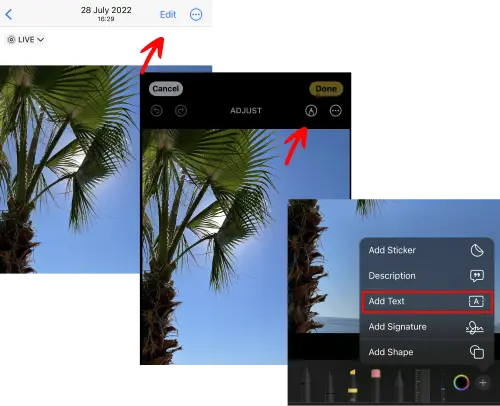
How to add text to photos on iPhone
Why to add text to a photo? Who knows: to add some comments, important information, or congratulations, for example. In any case, adding text to a photo is very easy, just follow the steps:
- Open the photo in the Photos app and tap “Edit”
- Tap on a pencil icon
- In “Markup” click on the “+” icon at the bottom and select “Add Text.” Enter your desired text, then adjust its size, color, and placement
- Tap “Done” to save your changes
How to resize photos on iPhone without cropping
In some cases, you may want to adjust the dimensions of a photo without cropping it. To resize a photo on your iPhone without cropping:
- Open the photo in the Photos app and tap “Edit”
- Select the crop icon, then tap “Aspect” at the bottom
- Choose the size you need. Tap “Done” to apply the changes

Tips for improving photo quality on your iPhone
Adjust the lighting before adding filters: lighting has a greater impact than any filter. Start by adjusting the exposure, brightness, highlights, and shadows. Once the lighting looks balanced, filters become optional, rather than a way to “save” the photo.
Avoid overprocessing: it’s tempting to push the sliders all the way, but small adjustments usually give the best results. Too much contrast, sharpness, or saturation can make a photo look unnatural and distracting.
Keep colors natural: if skin tones or familiar objects start to look “off,” it’s a sign that you’ve gone too far. Try to achieve colors that are close to reality, especially for portraits and everyday photos.
Maintain consistency in your social media photos: when posting regularly, similar brightness, color palette, and style make your feed cleaner and more focused. You don’t have to use the same filter every time just a consistent approach to light and color is enough.
How to save edited photos on iPhone
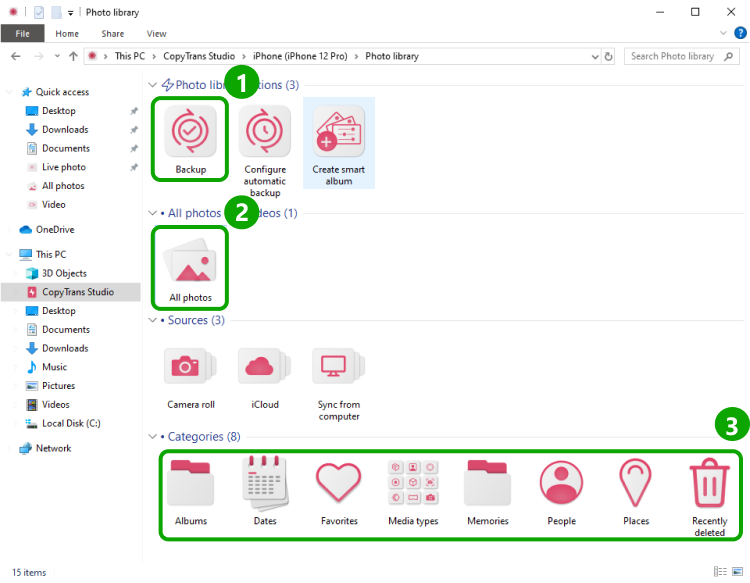
Now it is time to download your photos from the iPhone to the PC, and CopyTrans has a solution for you: the best way to transfer photos is to use CopyTrans Studio.
- Download and install CopyTrans Studio. Download CopyTrans Studio
- Click on the CopyTrans Studio icon. Open the program.
- Choose your iPhone and Photo Library
- Now you can see different options to back up your photos
- To save edited photos on your PC, find pics and drag-and-drop them to your PC or use the Smart Album function.


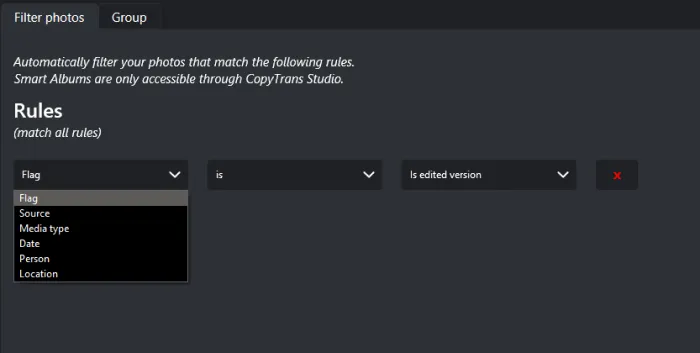
More information about how to use Smart Album can be found in our guide.
Edit photos
FAQ
1. Is it possible to edit only part of a photo, for example, to make the background darker but keep the brightness of the subject?
This cannot be done directly using the built-in Photos app—it does not (yet) support selective editing. But there is a workaround: copy the photo, edit one version for the background and another for the subject, and then merge them using a free app to edit photos. It takes a few extra steps, but it will work if you insist on your lighting.
2. Why do some filters look amazing on one photo but terrible on another?
Because filters aren’t adaptive — they just apply a fixed set of changes. So if your photo already has warm lighting, a warm filter will make it too bright. If it’s a flat shot, a high-contrast filter might finally bring it to life. The secret? Use filters as a starting point, then adjust them manually. That way, you can tailor them to your photo, rather than forcing your photo to fit the filter.
3. Can I copy changes from one photo and apply them to others?
Yes, and this is very convenient if you are editing several photos at once. Just open the edited photo, click on the three dots (…) > “Copy changes”, then go to the next photo, click on the same menu and select “Paste changes”. This is very convenient when you want to achieve a consistent style, especially for vacation photos or product shots.
4. Will editing a photo reduce its quality?
No, if you use the built-in tools. Editing on the iPhone does not destroy the original file — the original remains unchanged in the background, even if you change the settings significantly. You can return to the original at any time. However, if you continue to export and re-edit photos in different apps, compression may occur. For basic operations, use the Photos app and you’ll be fine.
5. What one editing technique doesn’t seem obvious but works every time?
Straighten everything. Not just crooked horizons — straighten buildings, walls, door frames. It’s subtle, but our eyes are tuned to notice when lines are uneven. Even if the lighting or colors aren’t perfect, a well-aligned photo immediately looks more thoughtful and professional. Bonus tip: use the vertical and horizontal perspective tools in the Crop menu. You’ll thank yourself later.
How to edit iPhone photos
Conclusion
Editing photos on your iPhone shouldn’t be a complicated task. The tools in the Photos app are simple, fast, and surprisingly effective at fixing minor flaws that prevent you from getting a great shot. You don’t need professional software, and you don’t need to spend hours learning how to use it.
I tested every feature on real photos — the ones that really matter to you, not perfect studio shots. Some edits took just a few seconds, but completely changed the perception of the image. Straightening a tilted horizon, softening harsh lighting, increasing contrast to enhance colors — all this happens right here, in a few taps.
If you’ve read this far, you probably have a photo in mind. Go back to it. Open it in the Photos app and try out the tools we’ve talked about — cropping, adjusting, filtering, fine-tuning. You can undo any action, so there’s no risk involved. And when the photo looks the way it should, you’ll know it.