Sometimes a photo taken on an iPhone is displayed in the wrong orientation. It may appear upside down, flipped upside down, or displayed differently after being published. In some cases, the image appears to be correctly rotated in the Photos app, but changes orientation when uploaded to a website or sent to another device.
These issues are usually related to how the iPhone stores orientation data and how other apps interpret it. In this article, you’ll learn how to rotate a photo on your iPhone step by step, how to save the rotation correctly, and what to do if the image continues to display incorrectly.
- iPhone photo edit hack: Rotate Photo
- What to do if the photo keeps rotating after you fix it?
- The Rotate option is inactive
- How to save rotated photos on iPhone
How to rotate a photo on iPhone
If an image is displayed sideways or upside down, you can correct it directly in the Photos app. Apple includes built-in editing tools that allow you to rotate and adjust images without installing additional software. The process is simple and works the same in most recent versions of iOS. Follow these steps to rotate a photo on your iPhone:
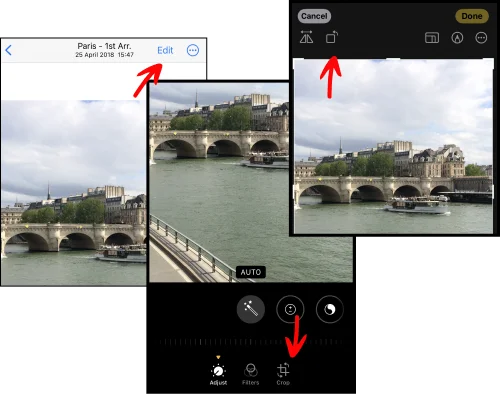
Open the Photos app and find the image you want to fix. Tap on the photo** to open it in full screen mode.
Tap Edit in the upper right corner. The image editor will open.
At the bottom of the screen, tap the crop/rotate icon (a square with two arrows around it).
Tap the rotate button in the upper left corner of the editing panel. Each tap rotates the image 90 degrees counterclockwise. Continue tapping until the photo appears in the correct position. When the orientation is correct, click Done to confirm the changes.
Once you tap Done, the rotation will be saved automatically. There is no separate save button, and you don’t need to export the image. The edited version becomes the current version of the photo in your library. However, the original image is not lost forever you can return to the photo, tap Edit, and select Revert if you ever need to restore it to its original state.
Rotate photo
What to do if the photo keeps rotating after you fix it?
Sometimes you rotate a photo, press “Done,” and everything looks correct in the Photos app, but after publishing, the image reappears sideways. In other situations, you may not be able to rotate the photo at all because the editing tools are unavailable. Below are the most common causes and how to fix them.
The image looks correct on the iPhone but incorrect after posting
If the photo displays correctly on your iPhone but changes orientation when uploaded to a website or sent to another device, the problem is usually related to orientation metadata.
The iPhone does not always physically rotate the image file. Instead, it often stores orientation information in the file’s metadata, instructions that tell applications how the photo should be displayed. Most modern applications read this data correctly, but some platforms ignore it, which can cause the image to appear incorrectly.
To prevent this from happening:
After rotating the photo, tap “Done,” then try copying the edited image (open the photo → tap the three dots → select “Copy”).
You can also export the image by sending it to “Files” and saving it again. This may create a version with the corrected orientation applied more permanently.
If the problem persists, try sending the photo in a different format (for example, by email instead of instant messaging, or save it in JPEG format if another format is used).
In most cases, resaving or exporting the edited version solves the problem.
The Rotate option is inactive
If you cannot click Edit or the Rotate tool is inactive, editing may be restricted. Check the following:
Ensure that the photo is not locked. If screen time restrictions are enabled, editing privileges may be limited.
Make sure the image is not in a shared album. Some shared photos may have limited editing capabilities depending on how they were added.
Make sure editing is allowed. If the photo was synced from another device or app, you may need to download the original file to your iPhone before you can edit it.
Once you have full editing access, you should be able to rotate or straighten the photo normally.
How to save rotated photos on iPhone
Now you are ready to download the rotated photos to PC. It is easy to do with CopyTrans Studio. It will also help if you would like to rotate them on your PC.
- Download and install CopyTrans Studio. Download CopyTrans Studio
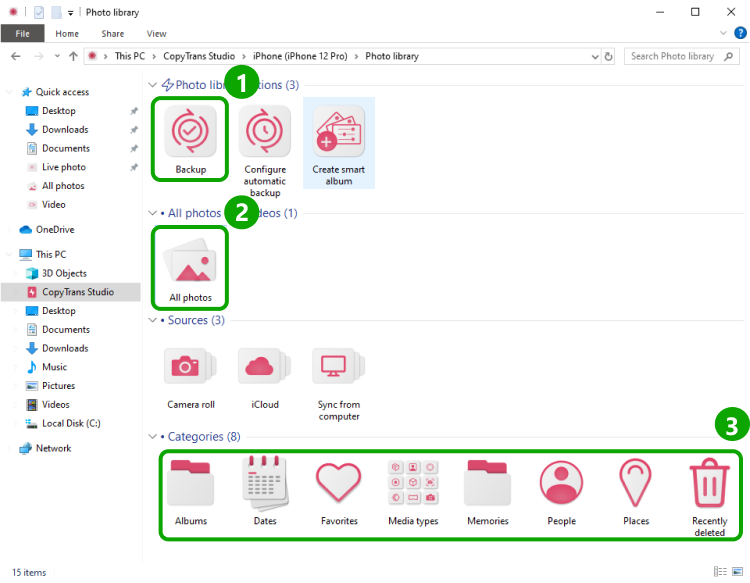
- Click on the CopyTrans Studio icon. Open the program.
- Choose your iPhone and Photo Library
- Now you can see different options to back up your photos
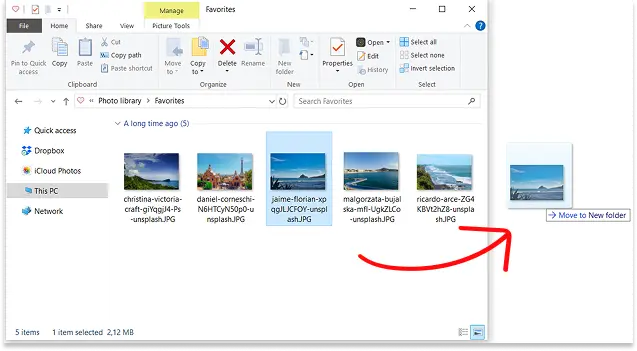
- To save photos on your PC, find pics and drag-and-drop them to your PC or use the Backup function.


How to rotate a photo
Final Thoughts
Rotating a photo on your iPhone takes just a few seconds, but doing it correctly ensures that the image will display properly in all apps and on all devices. Whether you’re adjusting a single photo in the Photos app or fixing an orientation issue before posting, the built-in editing tools make the process easy.
If your photo still displays incorrectly after rotating it, this is usually due to how orientation data is interpreted outside of your iPhone. In this case, the issue can usually be resolved by saving your changes correctly or re-exporting the image.
With these steps, you can quickly fix the orientation of a photo and ensure that your images look right wherever you use them.