We use our iPhones to take photos all the time, sometimes without a second thought. It’s fast, convenient, and the quality is good enough for most situations. But if you’ve ever looked at someone else’s photos and wondered why theirs look a little sharper, more balanced, or better framed, the answer usually lies in how they use the camera settings.
The iPhone camera has a lot of built-in tools that can change the way you shoot, such as adjusting exposure manually, locking focus, activating grid lines to improve composition, or switching between photo formats. Most of them are easy to use once you know they exist, but they’re not always obvious.
This article is a complete guide to getting the most out of the iPhone camera. No verbiage: just clear explanations, practical tips, and useful features that you can start using right away. Whether you take photos for work, for social media, or just for yourself, here you’ll find everything you need to take better-looking, more beautiful images and videos with your iPhone.
Let’s see what’s possible and how to achieve it with the camera you already have.
- How to turn off Camera Sound on iPhone
- How to turn on Night Mode iPhone Camera
- How to get a grid on iPhone Camera
- How to reset iPhone Camera Settings
- iPhone 16 camera button
- Back up iPhone photos
How to turn off Camera Sound on iPhone
If you want to take a picture quietly without the shutter clicking, there are two basic ways to turn off the camera sound on iPhone.
1. Use silent mode
The easiest way is to switch your iPhone to silent mode using the Ring/Silent switch on the left side of the device:
- Turn the switch toward the back of the phone
- When you see an orange bar, silent mode is enabled
- Now open the Camera app and take a picture — without the shutter sound
NOTE: this method also mutes other system sounds such as notifications and ringtones.
2. Turn Down the Volume in Control Center
Another way to silence the camera is to manually lower the volume on your iPhone:
- Swipe down from the top-right corner of the screen to open Control Center
- Drag the volume slider all the way down until you see the muted speaker icon
NOTE: this mutes the shutter sound along with other sound signals without needing to switch to Silent Mode.
3. Use Live Photo Mode
You can also try taking pictures with Live Photo enabled. This feature captures a short moment of motion and sound before and after the photo—and it usually mutes the shutter sound by default.
- Open the Camera app. Make sure the Live Photo icon (a circle with rings) is yellow, which means it’s on.
- Take your photo. No shutter sound should play.
NOTE:Live Photo works in most regions, but in some countries, the shutter sound may still be required by law.
How to turn on Night Mode iPhone Camera
Night mode helps you take brighter, clearer photos in low light without using the flash. It works by capturing multiple frames over a few seconds and blending them for a sharp, well-lit result.
It doesn’t need to be turned on manually. When the iPhone detects a dark scene, a yellow moon icon appears at the top of the screen. The number next to it indicates how long the exposure will take (for example, “1s” or “3s”).
To take a picture in Night Mode:
- Open the Camera app
- Wait for the moon icon to appear
- Press the shutter button and hold the phone still until the timer runs out
You can adjust the exposure time by tapping the moon icon and moving the slider, or turn it off completely for that photo.
Night mode is available on iPhone 11 and newer, and on the latest models it also works with the front and ultra-wide-angle cameras. For best results, place your phone on something solid or use a tripod. Night mode doesn’t just brighten the scene, it preserves the atmosphere without the harshness of flash.
How to get grid on iPhone Camera
There was a time when I would take a photo, think it looked great, and then notice that the horizon was tilted or the main object was slightly off-center. There was nothing wrong with that, but it always annoyed me. That’s when I discovered the camera grid.
The grid is one of those features that seems simple but makes a huge difference. It adds a simple overlay — two vertical and two horizontal lines that divide the screen into nine equal sections. These lines help frame the shots in a more thoughtful way. The idea is based on the “rule of thirds,” a classic photography technique: instead of placing the subject in the center, it should be placed along the grid lines or where they intersect. This gives the image balance and fluidity without requiring any technical knowledge.
So, how to turn on the grid on iPhone?
- Go to “Settings” on your iPhone
- Scroll down and select “Camera”
- Turn on the switch next to “Grid”
Once enabled, you’ll see the grid every time you open the Camera app. It doesn’t show up in the image; it’s just a hint for you to set up the shot. I found it particularly useful for straightening the horizon, leveling buildings, and shooting anything from flat plans to portraits.
It’s a tiny feature, but if you like clean, balanced shots, it’s worth keeping it on all the time.
How to reset iPhone Camera Settings
Sometimes your iPhone Camera doesn’t behave the way you expect it to — it can keep opening in video mode, keep filters on, or forget the last settings you used. If this is the case, the camera settings reset can help you fix these flaws without deleting your photos or apps.
There are two ways to reset iPhone camera settings, depending on what you want to clear:
1. Resetting camera behaviors only (keeping the settings)
If your camera is constantly switching modes or applying unnecessary settings, check the “Save Settings” box first. This will let you decide if the Camera app should remember things like the last mode used (Photo, Video, Portrait), filters, or Live Photo status.
To set this up: go to Settings > Camera > Save Settings and turn on the settings you want to save.
If none of these are enabled, the camera will reset to defaults every time you open it. Enabling these options may save you from having to constantly change settings.
2. Reset all settings (full reset)
If the camera app doesn’t work, freezes, or behaves very strangely, you may need to do a full reset. This won’t delete photos or apps, but it will reset system settings such as Wi-Fi passwords, display settings, and privacy permissions.
To do this: go to Settings > General > Transfer or Reset iPhone > Reset > Reset All Settings.
This will fix any hidden issues that may be interfering with the camera or other parts of your phone.
iPhone 16 camera button
In the iPhone 17, as well as the iPhone 16, iPhone 15 Pro and 15 Pro Max, Apple has replaced the traditional Ring/Silence switch with a new Action Button. By default, the Action Button turns the silent mode on and off, which also mutes the camera shutter sound. This button is now used for more than just mute — you can customize it to quickly launch the Camera app or perform other quick actions, making it easier to capture moments on the fly.
To customize the Action Button:
- Open Settings
- Tap Action Button
- Select one of the options: “Silent Mode,” “Camera,” “Flashlight,” and more.
This new button adds versatility and speed, especially for photography enthusiasts who want quick access without having to dig through menus.
Save iPhone photos on PC
My advice to you — always save your photos to your computer. It’s a great way to secure your photo library. How do I do that? With CopyTrans Studio, of course.
- Download and install CopyTrans Studio. Download CopyTrans Studio
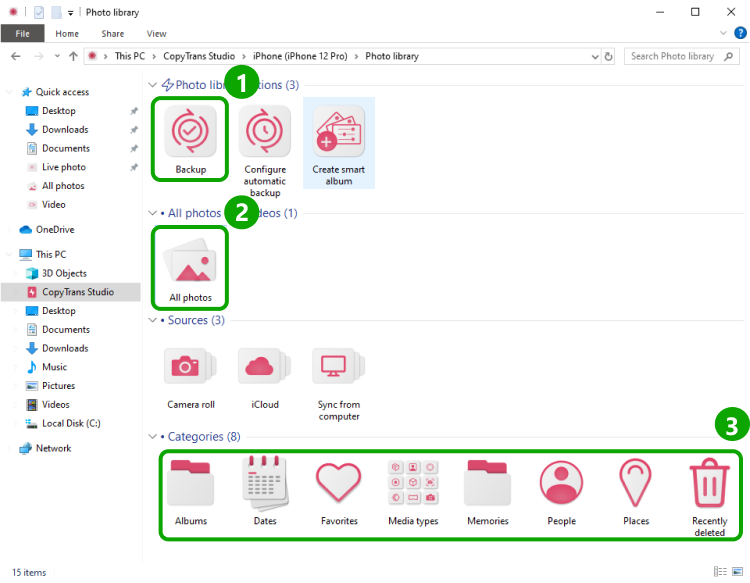
- Click on the CopyTrans Studio icon. Open the program.
- Here you see the icon of your iPhone. Choose it and then click on Photo Library.
- Open the All Photos folder (option 2 in the screenshot) and choose the photos you would like to save and just drag and drop them…
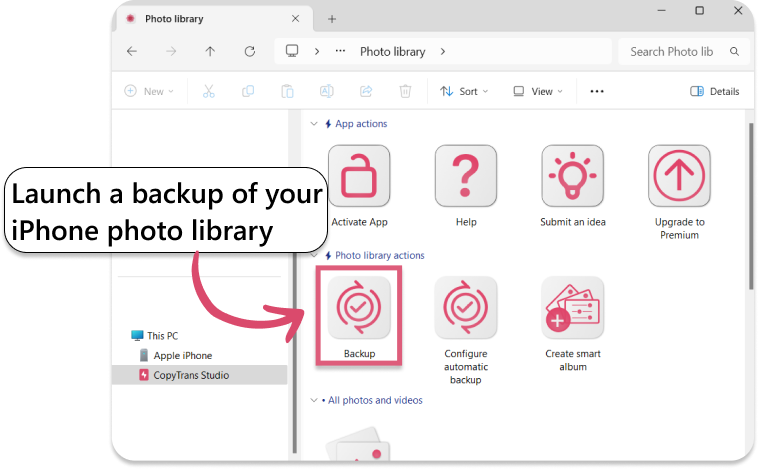
- …or just back up all photos.


iPhone 17 Camera
FAQ
1. Why do photos sometimes look different in the Camera app and the Photos app?
Because your iPhone quietly processes the image after you take it. The Camera app shows a live preview, while the Photos app shows the final version with HDR, lighting adjustments, and noise reduction applied. So colours or shadows may look a bit different — this isn’t a bug, it’s the result of post-processing.
2. Does using the camera drain the battery faster than other apps?
Yes, more than you might expect. The camera uses the sensor, image processing, screen brightness, and sometimes artificial intelligence functions simultaneously. If you notice that your battery drains quickly during photo shoots, this is normal — especially in low light or when shooting Live Photos or videos.
3. Why does my iPhone camera sometimes refuse to focus?
It’s usually not broken, it’s just confused. Very close objects, low light, dirty lenses, or reflective surfaces can throw off the autofocus. Wiping the lens and slightly changing the distance or angle often helps fix the situation faster than restarting your phone.
4. Is it better to edit photos on your iPhone or export them to another device?
For minor adjustments — cropping, exposure, colour — the iPhone editor is more than sufficient. But if you plan to make significant lighting adjustments or work with a large number of photos at once, exporting gives you more control. The key is knowing when ‘good enough’ saves time.
5. Why do some photos look sharp on my phone but blurry when I post them?
Messaging apps and social networks often automatically compress images. Your photo may be perfectly sharp on your iPhone, but lose detail when resized or optimised for sending. Posting via AirDrop or cloud links allows you to preserve the original quality.
5. How can you tell if a camera problem is software or hardware related?
If the problem appeared suddenly after an update, disappeared after a restart, or changed when you adjusted settings, it’s likely a software issue. Physical problems, such as constant blurriness, shaking, or black spots, tend to remain unchanged no matter what you do.
Camera settings iPhone
Final Thoughts
Over the years, I’ve realized that the iPhone camera is one of those tools we use every day without thinking about what it can do. I used to take quick snapshots on the go without paying attention to the settings. But once I started exploring features like silent mode, live photo, and night mode, everything changed. Suddenly, I wasn’t just capturing moments. I started making them as I remembered them.
That’s what this guide is all about: small tweaks that can completely change the perception of your photos, and you don’t need to be a photography expert to do it.
“Is it really worth diving into all these customizations?” My honest answer? Yes, if you care about making your photos look the least bit better. You don’t have to use all the features, but knowing what’s available gives you the freedom to choose.
So, next time you open the Camera app, pause for a moment. Try switching to Live Photo. Turn on the grid. Use Night Mode to avoid using the flash. Your iPhone is capable of more than it seems, and the best part? It’s already in your hands.