Why is it so hard to take a good selfie? You have taken 50 selfies and deleted them all because one looked too stiff, another too close, some made your face look strangely unfamiliar. You’ve tried different angles, you’ve moved to get better light, you’ve even changed your expression, and still nothing came out right.
It’s funny how something as simple as taking a picture can turn into a problem. The phone is there, the camera works, and you know what you look like. So why is it so complicated? The answer is simple: taking a picture isn’t just about pressing a button. It’s about how the camera sees you and how you look. And figuring out how to close that gap isn’t something most people are ever taught.
The truth is, taking a decent selfie doesn’t require filters, fake smiles, or influencer-like confidence. With a few simple changes, such as finding the right light, adjusting the angle, and letting yourself get caught up in the moment, you can take photos that look natural and genuinely reflect your appearance.
In this guide, I’ll cover:
- Step 1. Basic setup: Prepare all the technical points
- Step 2. Ways to take a picture of yourself without assistance
- Step 3. Find your best angle
- Save selfies to PC with CopyTrans Studio
- How to take pictures of yourself: FAQ
No pressure or over-the-top advice, just simple tips that will help you take photos you’ll finally love to keep.
How to take a selfie?
Step 1. Basic setup: Prepare all the technical points
Let’s start with the basics, because even the best angle or pose won’t help if your camera is dirty or the lighting is ruined. I’ve experienced this more than once — taking selfies that seemed perfect at the time and then realizing that the shot turned out hazy… all because of a greasy fingerprint on the lens. Yes, it’s important.
Here’s a list of quick actions to do before you start posing:
- Clean your camera lens: sounds obvious, but it makes a huge difference. A quick wipe with a microfiber cloth (or a shirt sleeve in desperate cases) can instantly sharpen the image.
- Use natural light or ring light: natural light is your best friend. Stand facing a window or step outside. If you are often indoors, a little ring light can be a great help, especially in the evening.
- Avoid harsh backlighting: that dreamy glow of the window behind you? It may look good in real life, but it turns you into a silhouette in photos. Try positioning the light in front of you.
- Use the back camera whenever possible: yes, it’s harder to frame, but the back camera almost always takes sharper, better photos. Try using it when you want to get something more polished.
- Stabilize your phone: leaning your phone against a stack of books or using a cheap tripod allows you to move freely and try different poses without being concerned about blurring.
When you’re all set, things get a lot easier, because you’re setting up your phone with all the conditions for it to do its job. If you have the basic skills, you can stop worrying about the technical details and focus on what really matters: having fun, trying different poses and conveying your mood. Everything you need to do will be done with the program, and you won’t have to do it.
Step 2. Ways to take a picture of yourself without assistance
What do you do if you want to take a picture and there’s no one around to hold your phone? Holding your arm out forever gets tiresome, and frankly, it limits your creativity when it comes to framing and poses. Luckily, phones are smarter than we think. Here’s how you can go hands-free:
- Use the timer mode: your iPhone allows you to set a 3-, 5- or 10-second delay. Pick up your phone, press the shutter button, and give yourself a few seconds to strike a pose.
- Apple Watch or Bluetooth remote: if you have an Apple Watch, you can view and take pictures from your wrist. Or buy a cheap remote shutter — they are tiny, work via Bluetooth, and make a huge difference.
- Voice Control or Siri: on iPhone, use voice control or add a Siri “Say Cheese” shortcut to take hands-free shots. No more rushing to press a button.
- Try burst shooting: want to take a picture while spinning, walking, or laughing? Burst mode lets you take a series of shots so that you can choose the best one later.
TIP: once you’ve taken your photos, don’t forget to back them up with CopyTrans Studio. It makes saving photos from iPhone to PC easy and quick, so you won’t lose that perfect shots.
How to pose naturally?
Posing is where most of us freeze up. I used to look at the camera, smile mechanically, and wonder why it didn’t look right. The trick? Stop trying to pose and start moving. Here are a few ways to look natural and unforced:
- Turn slightly: if you are facing forward in front of the camera, your facial features will be flat. Turn your body or face slightly to the side to add depth and softness.
- Use gestures: touch your hair, look away or pretend to talk. Small movements make a big difference.
- Hold props: a coffee cup, a book, a phone – keep your hands busy this way and the photo will immediately become more casual.
- Create depth: move away from the wall. Let objects blur in the background. Your photo will appear less flat and more alive.
- Practice your facial expressions: seriously, stand in front of a mirror. Try different expressions and angles. You’ll learn what you like and what you don’t like. It’s not about being fake, it’s about being prepared.
Step 3. Find your best angle
Angles can make or break a photo — and it’s one of the quickest wins once you find what works for you. Here are a few rules of thumb:
- Phone just above eye level: this angle naturally emphasizes your facial features and opens up your eyes. Try it and see the difference
- Tilt your head: a subtle tilt can change the whole atmosphere of the photo. It adds a sense of movement and keeps the photo from appearing too stiff
- Lengthen your neck: it seems strange, but a slight lift of the neck creates a clearer jaw line and a more confident posture
- Avoid low angles: unless you want to do something dramatic or stylized, low angles are usually not very flattering
- Use the rule of thirds: don’t center yourself in every shot. Try to stand a little off to the side. This will create a more dynamic and interesting shot.
I often take 5-10 shots with small adjustments between each one — head tilt, direction of gaze, facial expression. One of these usually turns out to be successful.
Save selfies to PC with CopyTrans Studio
After all the effort you put into taking a great selfie, the last thing you want is to lose it. If your phone is full, you accidentally deleted something, or iCloud has started acting up (yet again), it’s very easy to lose those moments. With CopyTrans Studio, you can quickly and safely transfer all your favorite photos from your iPhone to your PC. No need to rely on iCloud, iTunes or complicated settings. Just plug in your phone and transfer your photos to your computer.
What I like about CopyTrans Studio is that it’s simple from the start. The interface is clean, the process is clear, and it requires no technical knowledge. I can easily:
- View all the iPhone albums from the computer
- Select and export only the photos I want (no duplicates or clutter)
- Organize selfies by day, outfit, trip, or mood
- Free up space on the iPhone without losing anything important
Here is how to export your selfies from iPhone:
Download and install CopyTrans Studio.
Download CopyTrans StudioClick on the CopyTrans Studio icon. Open the program.
Choose your iPhone and then click on Photo Library.
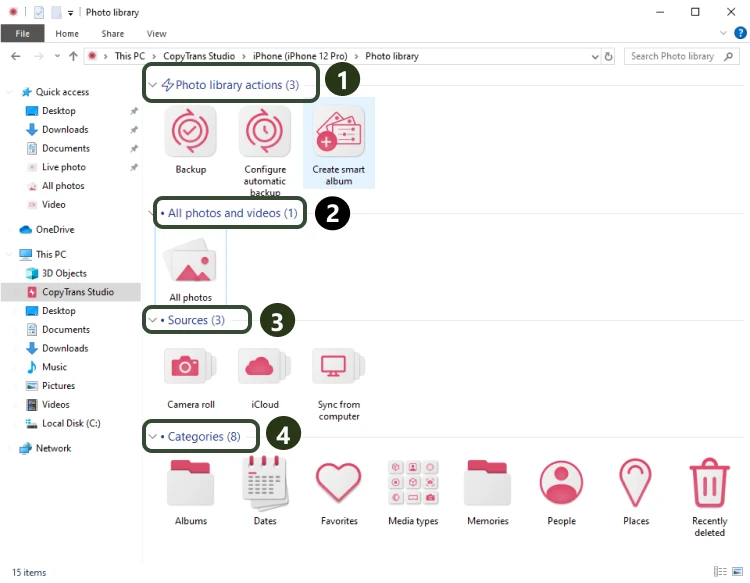
In the main window, you will see different options. Choose one:
Option 1: back up the whole library in one click. Note: it also does incremental backups without duplicates.
Option 2: open the “All photos” folder and drag and drop the images manually to the PC.
Option 3: choose between iPhone and iCloud photos.
Option 4: drag-and-drop photos separately by categories.
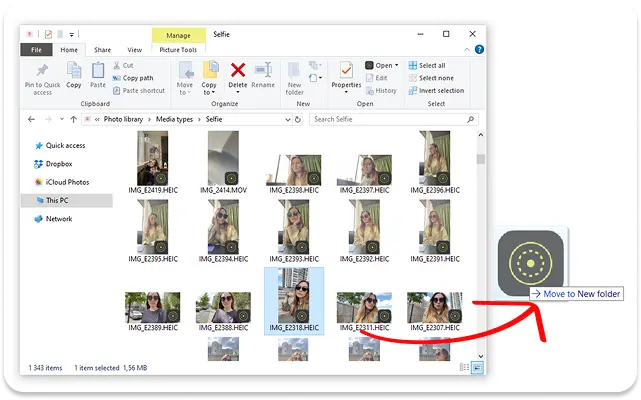
- Now, drag-and-drop photos to your PC.
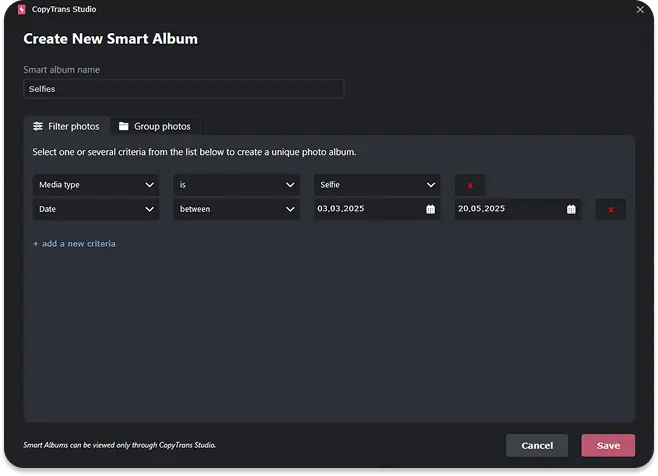
- You can also use the Smart Albums function and create a special album with selfies (use different filters, like the date, place, etc.).


How to take pictures of yourself
FAQ
1. How can I take good pictures of myself with my phone?
Use natural light, stabilize your phone, and find your best angle (usually slightly above eye level). Don’t forget to clean the lens first!
2. What’s the best lighting for selfies?
Natural light is ideal—stand facing a window or go outside during golden hour (just after sunrise or before sunset). Avoid direct overhead or backlighting.
3. How do I take pictures of myself without holding the phone?
Use the phone camera timer, a Bluetooth remote, or voice control. iPhone users can also use Siri with the “Say Cheese” shortcut.
4. How can I pose for selfies without looking awkward?
Try slight head tilts, natural movements like touching your hair, and props like a book or a coffee cup. The key is to move a little and keep it casual.
5. Should I use the front or back camera for selfies?
The back camera offers better quality, but it’s harder to frame. Use it if you have a tripod or mirror to help you see the screen.
6. What’s the easiest way to transfer iPhone selfies to a computer?
Use CopyTrans Studio, it lets you quickly move photos to your PC without needing iCloud or iTunes. Just drag and drop.
7. How do I find my best selfie angle?
Take a few shots from different angles and review them. Most people look best with the phone slightly above eye level and the face turned slightly to the side.
How to take good selfies?
Final Thoughts
Taking a great photo of yourself isn’t about striving for perfection, but rather capturing a version of yourself that feels authentic, confident, and maybe a little playful. The best shots are usually taken when you stop overthinking the “right” smile and just let your true energy shine through.
The next time you open the camera app, don’t aim for perfection. Aim for yourself. Whether it takes 3 or 30 shots, you’ll get there. And once you’ve captured that look you love, make sure you save it. With the right settings and CopyTrans Studio to back up your favorite photos, you’ll always have a version of yourself that you’ll be proud to keep.
Get Started with CopyTrans Studio