The sky is darkening. Silence descends upon the world. Eclipses (solar or lunar) are some of the most spectacular natural phenomena we witness. And of course, the immediate instinct is to pull out your iPhone and take a picture of the eclipse. But what appears on the screen is often not the awe-inspiring sight you just saw with your own eyes. It’s either a blurry white spot, an overexposed dot, or an image so dark that the magic of the moment completely disappears.
Capturing an eclipse – solar or lunar – on an iPhone is a surprisingly technical challenge. The lighting conditions are extreme. The event is happening very quickly. And your iPhone camera, as good as it is, can’t be automatically optimized for these once-in-a-decade conditions. But with a little preparation, the right accessories, and a few smart camera tweaks, you can take beautiful and detailed photos of the eclipse right with your iPhone.
- Understand what you are shooting
- What actually helps to take photos of the eclipse?
- iPhone camera settings and how to take a picture
- How to save eclipse photos on PC?
- Lunar eclipse: FAQ
Get started so that the next time the sky puts on a show, you’ll be ready to capture it for real.
Understand what you are shooting
Before you point your iPhone at the sky, it’s important to know exactly what kind of eclipse you’re shooting and how it affects your settings.
☀️ Solar Eclipse
Occurs when the Moon moves between the Earth and the Sun, temporarily blocking sunlight.
- Requires strict precautions
- You’ll need a sun filter to protect your eyes and your iPhone camera
- The lighting changes quickly – it all depends on the time
🌑 Lunar Eclipse
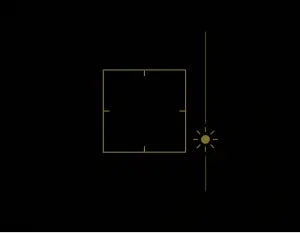
Occurs when the Moon passes through the Earth’s shadow, giving it a reddish or copper color.
- Much easier and safer to observe without filters
- Great for experimenting with night mode and long exposures
- Occurs over a longer period of time, so there is more time to take pictures
Check the time and visibility of the eclipse
Not every eclipse is visible from every location. To make sure you’re in the right place at the right time, use apps or websites like:
- Sky Guide – real-time sky tracking and alerts
- Time and Date – accurate eclipse maps and countdowns
- NASA’s Eclipse Tracker – official data and global tracks
Planning ahead is half the success. The rest is knowing how to capture it, and that’s what we’ll do next.
What actually helps to take photos of the eclipse?
Your iPhone camera is very powerful, but eclipses push it to the limit. Why? Because you’re dealing with sudden changes in lighting, distant objects, and very little room for error. The right equipment can give you control, clarity, and safety. Let’s take a look at each item and why you should use it:
Solar filter: it is a dark filter that blocks the harmful sun rays.
Why it’s important: if you’re photographing a solar eclipse, this is the most important item in your kit. The solar filter protects both your eyesight and your iPhone camera sensor from damage. Without one, you risk eye injury, overexposure, or even ruining your camera. It also greatly reduces glare, so you’ll get a clear outline of the eclipse instead of a glowing blur.
Look for: overhead solar filters or protective films that you can securely attach to your lens or tripod.
Tripod or stabilizer: a tool that allows you to hold your iPhone steady while shooting.
Why it’s important: even the steadiest of hands can’t stay still enough during long exposures or zoom shots. A tripod prevents blurring, which is especially important during lunar eclipses or low-light phases of a solar eclipse.
Tip: the lightweight, adjustable tripod with smartphone clip is ideal for outdoor use.
Overhead telephoto lens: attachable lens that gives your iPhone optical zoom.
Why it’s important: iPhones rely heavily on digital zoom, which can degrade the quality of photos. A telephoto lens lets you zoom in closer on the eclipse, capturing more textures, details, and atmosphere like the surface of the moon or the solar corona.
Tip: choose lenses with minimal distortion and good reviews for iPhone compatibility.
Remote shutter or timer: a Bluetooth remote or the iPhone built-in photo timer.
Why it’s important: when you tap the screen to take a picture, there may be a subtle shake, especially if you have zoomed in. Using the remote or a 3-10 second timer avoids this and allows you to get sharper, cleaner pictures.
Tip: even a $10 Bluetooth clicker can dramatically improve your results.
Manual Camera App: an app that lets you manually control camera settings such as focus, exposure, ISO, and shutter speed.
Why it’s important: your iPhone camera app makes decisions for you by default. But during an eclipse, automatic exposure and focus often fail – your subject is either overexposed or underexposed. Manual apps like Halide, ProCamera, or Camera+ let you:
- Set the focus to infinity
- Reduce exposure for dramatic contrast
- Adjust ISO to reduce noise in low-light scenes
Bonus: many of these apps allow you to shoot in RAW format, giving you higher quality files for later editing.
Choose the right place and time
Eclipse photography is not only about what you see in the sky but also about where you are on the ground. The location you shoot from will determine the entire photo.
Here’s how to find the right spot:
- Choose open places:
Think about parks, fields, rooftops: anywhere you have a clear and unobstructed view of the sky. Buildings and trees can interfere with photography when the eclipse is low over the horizon. - Minimize light pollution:
Darkness is important for a lunar eclipse. Stay away from glowing windows, neon signs, and streetlights. The less ambient light, the better the details of the moon will be seen. - Avoid clouds at all costs:
Check the weather forecast in advance. Use an app like Windy or AccuWeather to monitor the sky in real time. One stray cloud can ruin the entire event. - Arrive early (30-60 minutes in advance):
Set up calmly. Get the shot. Try different angles. Taking time to catch your breath before the eclipse starts will help you avoid making hasty mistakes.
iPhone camera settings and how to take a picture
After you’ve gathered and prepared, it’s time to set up your iPhone to get the best eclipse photos possible. You don’t need to be a professional photographer, but knowing what settings to use (and when) can make the difference between a blurry dot and a breathtaking shot. Let’s break it down.
For a solar eclipse
Solar eclipses are bright, fast-changing and require special attention: both for your safety and for your iPhone camera.
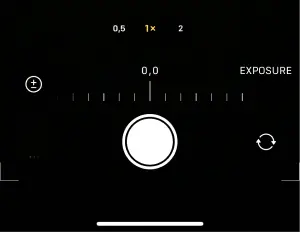
Options for customization:
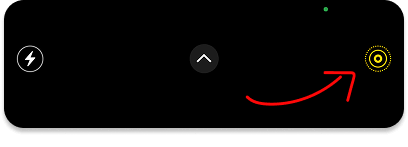
- Focus: press and hold the button on the sun to lock focus. This will prevent your phone from readjusting while you’re shooting.
- Exposure: after locking focus, swipe down to darken the image: this will reveal the shape of the eclipse and avoid overexposed blur.
- Mode: use Live Photo or Burst mode to catch small changes as the eclipse passes.
Extra tip: don’t remove your solar filter, even during a total eclipse. If you want to capture the corona (the Sun’s outer glow), do so only if you’re 100% sure it’s safe to do so.
For a lunar eclipse
Lunar eclipses are easier to photograph and completely safe for your eyes and camera.
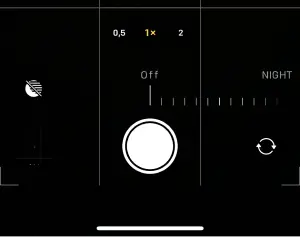
Camera Settings:
- Zoom: use a 2-3x zoom to get closer to the moon. Avoid zooming more than 5x (it reduces image quality).
- Focus: press and hold the moon to lock focus. If it looks blurry, refocus it slightly by moving your finger.
- Exposure: adjust it manually so that the Moon does not look like a glowing white spot. Turn it down a bit to emphasize surface details.
- Night Mode: if your iPhone supports this feature, Night Mode can automatically improve low-light shots during totality.

Extra tip: use a 3- or 10-second timer to take a picture without touching your phone, this will avoid camera shake.
With these settings and tips, you’re ready to shoot. The good news? Today’s iPhones have amazing capabilities for shooting at night and during high-contrast events like eclipses, so don’t be afraid to experiment.
Pro tips for the best eclipse photos
- Shoot the transitional phases: the moments just before and after a total eclipse often provide the most dramatic lighting: don’t wait for the peak.
- Try timelapse mode or video: set your iPhone on a tripod and record the entire eclipse. You can turn it into a short, dynamic video later.
- Add foreground elements: include silhouettes of trees, buildings or people to give your photo depth and a sense of place.
- Use HDR or shoot in RAW: HDR balances light and dark areas. If your iPhone supports RAW format, enable it for more flexible editing later.
How to save eclipse photos on PC?
Once the eclipse photos are taken, edited, and you are finally happy with the results, there is one more step left: save them to your PC. And the easiest way to transfer these photos from iPhone to PC (without iCloud, cables and dataloss) is to use CopyTrans Studio. Let’s see how to back up your eclipse photos in just a few clicks.
- Download and install CopyTrans Studio. Download CopyTrans Studio
- Click on the CopyTrans Studio icon. Open the program.
- Here you see the icon of your iPhone. Choose it and then click on Photo Library.
- Open the All Photos folder (option 2 in the screenshot) and choose the photos of the eclipse you made.
- Now, drag-and-drop photos to your PC.


Lunar Eclipse
FAQ
Can I take eclipse photos without a solar filter?
Only during totality in a solar eclipse, and even then, for a few seconds. The rest of the time, always use a filter to avoid damaging your iPhone camera.
Which iPhone is best for photographing an eclipse?
Models from iPhone 11 and newer perform better thanks to Night Mode, improved sensors, and image processing. But even older models can deliver good results with a tripod and manual settings.
Will iPhone Night Mode help during a lunar eclipse?
Yes! Night mode greatly improves the quality of lunar eclipse photos, especially when combined with a steady tripod and slower shutter speeds.
How do I avoid blurry eclipse photos?
Use a tripod, lock focus and exposure, and reduce camera shake with a remote shutter release or timer.
How can you make your eclipse photos more dramatic?
Include foreground elements (such as trees or buildings), try different angles, and experiment with exposure settings for artistic effects.
Solar Eclipse
Final Thoughts
Shooting an eclipse with your iPhone may seem like a daunting task, but with the right preparation, a steady hand, and a few smart tools, it turns into a rewarding experience.
In this guide, we’ve covered everything you need to know:
- How to prepare for solar and lunar eclipses
- What equipment matters (even on a smartphone)
- The best iPhone settings and shooting techniques
- Tips from the pros to make your shots unique
- And most importantly, how to preserve your eclipse memories with CopyTrans Studio
Whether it’s the red moon over your city or the sun hiding behind the shadows at noon, now you have everything you need to capture the moment and preserve it.