Your iPhone holds a collection of moments: celebrations, travels, everyday joys. But how often do those photos stay buried in your Camera Roll? We take hundreds, sometimes thousands, of pictures, yet most of them never make it past the screen. What if you could bring them to life with just a few taps?
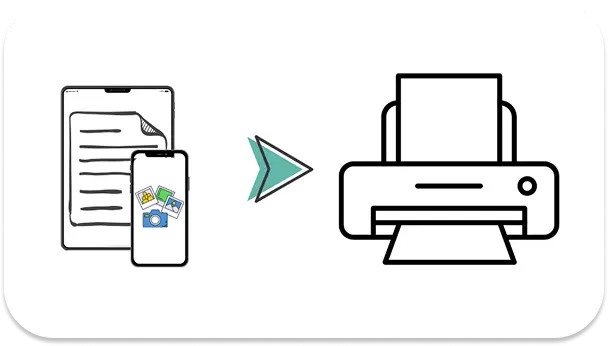
Printing photos from an iPhone might seem complicated at first, where do you start? Do you need a special app? What about printer settings? The good news is that it’s easier than you think. You can print directly from your iPhone using AirPrint, send your photos to a professional printing service, or even print at a local store. Whether you want a quick print for your desk or high-quality images for an album, there’s a method that fits your needs.
In this guide, I’ll walk you through all the options, step by step. No tech headaches, just simple ways to turn your digital moments into something real. Let’s get started!
- Why print photos from iPhone?
- How to print photos from iPhone?
- AirPrint Function
- Print photos from PC
- Store or Online Printing
- Tips for Printing High-Quality Photos from Your iPhone
Why print photos from iPhone?
- See Your Favorite Moments Every Day
- Create Personal, Meaningful Gifts
- Turn Your Space into a Reflection of Your Life
- Keep Your Memories Safe, No Matter What
With thousands of photos on our phones, the best memories often get lost in the scroll. A printed photo, whether on your fridge, desk, or in your wallet, keeps those moments visible and tangible.
A printed photo feels more special than a digital file. Whether framed, in a photo book, or as a postcard, it turns a shared memory into a heartfelt gift.
Your walls and shelves can tell your story. Instead of generic decor, surround yourself with your own memories, framed, clipped to fairy lights, or on a gallery wall.
Phones break, cloud storage fails, and files get deleted. A printed photo doesn’t rely on technology, it’s a lasting backup you can enjoy for years.
Printing your iPhone photos isn’t just about nostalgia, it’s about making sure your best moments don’t get lost in the digital clutter. And the best part? It’s incredibly easy to do. Let’s go over how you can print your photos in just a few steps!
Print photos from iPhone
There’s no one-size-fits-all approach. Whether you want a simple home print, high-quality store prints, or fun mini stickers, here are your best options:
- Print at Home
- Order Professional Prints
- Use a Pocket Printer
✔ With AirPrint – The easiest way if you have a compatible printer. Just select a photo on your iPhone, tap “Print,” and you’re done.
✔ Without AirPrint – Use CopyTrans Studio to download photos to a PC and then use a standard printer.
✔ Print at a store – Upload your photos to Walgreens, CVS, or Walmart and pick them up the same day.
✔ Online photo services – Websites like Shutterfly and Snapfish offer high-quality printing delivered to your door.
✔ For instant, small prints – Bluetooth-connected mini printers like the HP Sprocket or Polaroid ZIP let you print anywhere.
Now, let’s go step by step through each method.
Option 1: Printing at Home
The Fastest and Easiest Way – AirPrint
The first time I used AirPrint, I was surprised by how easy it was. No cables, no setup headaches, just tap and print. If you have an AirPrint-compatible printer, this is by far the simplest method.
- Check your printer – Make sure it supports AirPrint (most HP, Canon, and Epson models do).
- Connect to Wi-Fi – Your iPhone and printer need to be on the same network.
- Open the Photos app on the iPhone – Select the picture you want to print.
- Tap Share → Print – Choose your printer and adjust the settings (size, copies, paper type).
- Hit Print – Your photo will be on paper in seconds.
No AirPrint? No Problem
If your printer doesn’t support AirPrint, you can still print using your home printer.
Step 1: Save photos to a PC with CopyTrans Studio
Before printing, I always like to transfer my photos to my PC. Why? Because it gives me more control. I can edit them on a bigger screen, choose the best resolution, make sure nothing gets lost in the process, and print photos on my home printer. If you’re like me and you prefer working on a computer before printing, CopyTrans Studio is a great tool.
Download and install CopyTrans Studio.
Download CopyTrans Studio Now!Click on the CopyTrans Studio icon. Open the program.
Choose the device and then click on Photo Library.
In the main window, you will see different options:
Option 1: backup the whole library in one click. Note: it does incremental backups without duplicates.
Option 2: open the “All photos” folder and copy images manually to the PC.
Option 3: choose between iPhone and iCloud photos.
Option 4: drag-and-drop photos separately by categories.
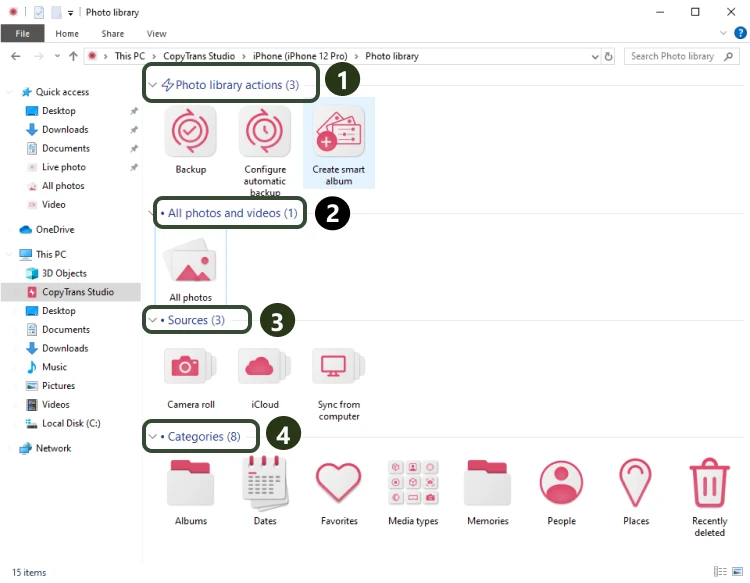
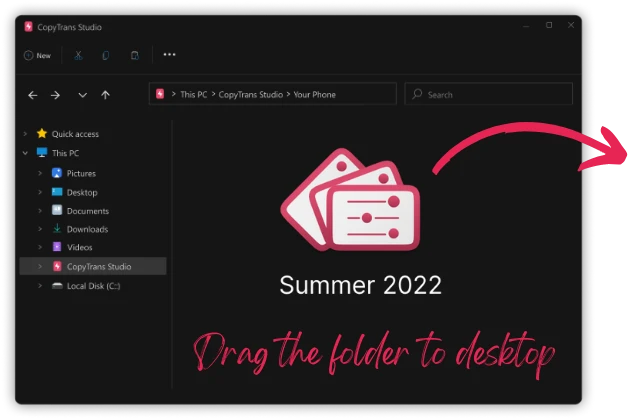
- The easiest way is to drag-and-drop photos or the whole folders to the computer.


Step 2: Print photos from PC
After you transferred your photos to the PC, whether for better organization, editing, or simply to avoid direct printing from your iPhone, you have more control over the final print quality. Printing from a PC ensures higher resolution, better customization, and a smoother process, especially when dealing with older or non-AirPrint-compatible printers.
Now Select the Right Printer and Paper Settings. Go to File → Print, or simply right-click on the image and select Print.
A settings window will appear, allowing you to choose:
- 🖨 Your Printer – Make sure your home printer is selected. If it’s not listed, make sure it’s properly connected via USB or Wi-Fi and that the latest drivers are installed.
- 📄 Paper Size and Type – If you’re using photo paper, select the corresponding option in the settings (e.g., Glossy, Matte, or Premium Photo Paper).
- 📏 Print Size and Layout – Choose whether you want borderless printing, a standard 4×6-inch print, or a larger format like A4 or A3.
- 🎨 Print Quality – If available, select Best or High Quality for the sharpest results.
Once everything looks good, click Print, and your home printer will do the rest. Depending on the quality settings and printer model, the process may take a few seconds to a couple of minutes.
For the best results:
✔️ Use high-quality photo paper instead of standard printer paper.
✔️ Let the ink dry completely before handling the print to avoid smudges.
✔️ Store printed photos properly to prevent fading over time.
Option 2: Store or Online Printing
Sometimes, home printing just doesn’t cut it. If you’re looking for high-quality, glossy prints, enlargements, or photo gifts, professional printing services are the way to go. Many retail stores like Walgreens, CVS, and Walmart offer same-day pickup, meaning you can upload your photos through an app or website, customize the prints, and collect them in a matter of hours.
For even more options, online photo services provide premium-quality prints delivered straight to your door. These services are ideal if you’re creating photo albums, framed prints, or personalized gifts like calendars and canvases. While it takes a few days for delivery, the superior quality and variety of print options make it worth the wait.
The best part? You don’t need to be a professional photographer to get stunning results. These services automatically adjust colors and sharpness, ensuring your prints look as good as possible.
How to print pictures from iPhone?
Tips for printing high-quality photos
Printing your iPhone photos is more than just hitting the print button, if you want stunning, high-quality results, a few key adjustments can make all the difference. From resolution to paper type, here’s how to make sure your printed memories look just as beautiful as they do on your screen.
Tip 1. Check Your Resolution: The Key to Sharp Prints
Not all images are fit for printing. A photo may look fantastic on your iPhone screen, but if the resolution is too low, it can turn out blurry or pixelated when printed.
✔️ Aim for at least 300 DPI (dots per inch) – This ensures your image has enough detail for sharp, crisp prints. Most iPhone photos meet this standard, but if you’ve cropped or resized the image significantly, it’s worth double-checking.
✔️ Avoid screenshots – Screenshots are typically saved in lower resolution and might not print well. If you’re printing a photo you originally took, always use the original image instead of a screenshot.
✔️ Check file size – Generally, the larger the file size, the better the print quality. If your photo is under 1MB, it might not be sharp enough for larger prints.
Tip 2. Use the Right Format: HEIC vs. JPEG
By default, iPhones save photos in HEIC (High-Efficiency Image Format) to save space while maintaining quality. However, not all printers and printing services support HEIC, so you may need to convert your photos to JPEG before printing. JPEG is widely accepted and ensures seamless printing without compatibility issues.
Tip 3. Adjust Brightness and Contrast: Your iPhone Screen Can Be Deceiving
iPhone screens are bright and vibrant, often making photos look better than they actually are. But when printed, images may appear darker or duller than expected.
✔️ Increase brightness slightly before printing, especially if the photo has shadows or dark areas.
✔️ Check contrast and color saturation, subtle tweaks can make a big difference.
✔️ Use your PC for final adjustments, if you’re transferring photos to a PC before printing, programs like Windows Photos, Photoshop, or Lightroom can offer a finer editing experience.
Tip 4. Choose the Best Paper: Glossy vs. Matte vs. Canvas
The type of paper you choose affects how your printed photo looks and feels.
- Glossy Paper – Vibrant, sharp, and reflective. Best for bright, colorful images but can show fingerprints easily.
- Matte Paper – Softer, more muted colors with no glare. Great for black-and-white prints, portraits, and art-style photography.
- Canvas Prints – A textured, professional-looking option perfect for large, framed wall art. Ideal for high-quality prints with a classic touch.
If you’re printing at home, check your printer settings to make sure it’s optimized for the specific paper type you’re using.
Turning iPhone photos into unforgettable gifts
A printed photo isn’t just an image—it’s a memory made tangible. Whether for birthdays, anniversaries, or just because, a thoughtfully printed photo can be far more special than any store-bought gift.
✔ Photo Books: Turn your best moments into a beautifully crafted album, perfect for travel memories, love stories, or family milestones.
✔ Custom Calendars: A year of memories, each month featuring a cherished photo. A perfect gift for parents or grandparents.
✔ Framed Prints and Canvases: Transform your photos into wall-worthy art for a personal touch in any space.
✔ Photo Mugs, Blankets and Pillows: Everyday comfort meets sentimentality, imagine sipping coffee from a mug with your favorite vacation shot on it!
✔ Mini Prints and Memory Boxes: Print Polaroid-style photos and hide them in books, jars, or gift boxes for an unexpected surprise.
✔ Handwritten Notes with Photos: A simple picture paired with a heartfelt note turns any message into a keepsake.
A printed photo lasts forever, far beyond a digital file. Which of your photos deserves to be more than just a swipe on your screen? 💙
Printing photos from iPhone
FAQ
Can I print photos from my iPhone without using AirPrint?
Yes. If you don’t have an AirPrint-compatible printer, you can still print photos by transferring them to your computer, using your printer’s own app, or uploading them to an online printing service. AirPrint is convenient, but it’s far from the only option.
Why do my printed photos look darker than they do on my iPhone screen?
iPhone screens are very bright by default, so photos often look brighter on your phone than they do on paper. When printing, try reducing the brightness of your screen when selecting photos and check your printer’s colour settings. This usually gives a result closer to what you see on the display.
Are Live Photos and burst photos printed correctly?
Yes, but only as still images. When printing a Live Photo or burst photo, the iPhone automatically selects a single frame. If you want to control the result, select the frame you want before sending the photo to print.
Is it better to print from the Photos app or export the images first?
The Photos app is great for quick printing. But if size, format, or quality are important to you (for example, when printing a photo book or large print), exporting images to your computer gives you more control over resolution and layout.
What photo format is best for printing from an iPhone?
JPEG is the safest choice, as it works well with most printers and services. HEIC files usually print well too, but some older printers or services may not support them properly, so converting to JPEG will help you avoid unpleasant surprises. Use CopyTrans Studio to convert in a few clicks.
Can I print photos from my iPhone when I’m not connected to the internet?
Yes, if the photos are stored on your device and you print to a nearby printer or via a computer. However, online printing services will require an internet connection to upload your images.
How to print a photo from iPhone?
Final Thoughts
Your iPhone photos capture memories, but if they simply stay forever in your camera roll, they’re easily forgotten. Printing them brings those moments to life, something you can touch, frame, and relive every day.
Printed photos also create connections. A framed picture sparks conversations, a photo album becomes a shared journey, and a Polaroid tucked into a book is a surprise waiting to be found.
But why stop at prints? Turn your favorite shots into wearable art, custom phone cases, or even edible chocolate prints. With so many creative options, your memories can be more than just pictures, they can be experiences.