The Northern Lights, or Aurora Borealis, are nature’s own light show, an otherworldly dance of green, purple, and blue waves across the night sky. But as magical as they are in person, capturing them on camera is a whole different story.
Many travelers eagerly aim their iPhones at the sky, only to end up with blurry smudges or complete darkness instead of the dazzling spectacle they witnessed. Common questions pop up:
- Why do my Northern Lights photos turn out blurry?
- Can I capture them without a professional camera?
- Do I need a special app?
But in fact, you don’t need an expensive camera to take pictires of Northern Lights. With the right iPhone settings, a few simple tricks, and the right conditions, you can snap stunning Northern Lights photos that look straight out of a travel magazine. Let’s dive into how you can make the most of your iPhone and turn fleeting moments into unforgettable images.
- Best Conditions for Photographing the Northern Lights
- How to Capture Northern Lights on iPhone
- Camera Settings for Northern Lights
- How to save Nothern Lights photos on iPhone
Northern Lights
Best conditions for photographing
Before diving into the technical details, let’s talk about when and where you’ll get the best chance of capturing the aurora. Even with the perfect camera setup, poor conditions—like clouds or city lights—can ruin your shot.
Here’s what you need to know:
1. Best Locations to See the Northern Lights
The further north you go, the higher your chances of witnessing this magical display. The best places to see and photograph the aurora include:
- Norway: Tromsø, Lofoten Islands
- Iceland: Reykjavik, Thingvellir National Park
- Finland: Lapland, Rovaniemi
- Sweden: Abisko National Park
- Canada: Yukon, Northwest Territories
- Alaska, USA: Fairbanks, Denali National Park
These locations sit within or near the Arctic Circle, where auroral activity is strongest. If you’re serious about capturing the Northern Lights, planning a trip to one of these destinations will significantly improve your chances.
2. Best Time to See the Northern Lights
While the aurora can technically appear year-round, the best months for viewing and photographing them are September through April. This is when nights are longest, giving you more time to catch a spectacular display. As for the best time of night? Aim for between 10 PM and 2 AM—this is when the sky is darkest, and auroral activity is often at its peak.
3. Weather Conditions Matter
Even if you’re in the right place at the right time, weather conditions play a crucial role in how well you can see and photograph the aurora. Here’s what to consider:
- Clear skies: Clouds will completely block your view of the Northern Lights. Check the weather forecast and look for locations with minimal cloud cover.
- Minimal light pollution: City lights can wash out the aurora, making it hard to see and even harder to photograph. Head to remote areas where the sky is as dark as possible.
- Cold temperatures: The best aurora activity often occurs on clear, cold nights. Dress warmly and prepare for long hours outside—you’ll need patience to get the best shots!
How to capture Northern Lights on iPhone
The truth is, while iPhones aren’t specifically designed for night sky photography, you can take incredible aurora photos—if you know the right settings and techniques. It’s not just about pointing and shooting; it’s about adjusting your camera manually, keeping your phone steady, and making the most of your environment.
Ready to capture the Northern Lights like a pro? Here’s everything you need to know to turn your iPhone into a powerful night photography tool.
Camera Settings for Northern Lights
Why Auto Mode Won’t Work
Why Auto Mode Won’t Work
Your iPhone is smart—too smart when it comes to night photography. In auto mode, your camera automatically tries to adjust for low light by increasing brightness and smoothing out details. The result? Blurry, dull, or even invisible auroras. To capture their vibrant glow, you need to take control of your settings manually.
Turn Off Flash and Night Mode
Before adjusting anything else, disable these two features:
- Flash: It won’t help at all—in fact, it will only light up objects in front of you, ruining the shot.
- Night Mode (on newer iPhones): While useful for some low-light shots, Night Mode often auto-adjusts settings in a way that doesn’t work well for the aurora. Instead, you want manual control over exposure and focus.
Use Long Exposure to Capture More Light
The key to photographing the Northern Lights is allowing more light into the camera sensor. Since the aurora is constantly moving, you need a longer exposure time to capture its full shape and colors.
- iPhone 11 and later: You can use Night Mode, but manually set the exposure time to the maximum (up to 30 seconds). This works best if you have a tripod.
- Older iPhones: You’ll need a third-party app like Slow Shutter Cam or ProCamera, which allow you to manually adjust exposure time.
Adjust Focus and ISO
- Manually set focus to infinity – This ensures the auroras, which are far away in the sky, stay sharp instead of blurred.
- Increase ISO slightly (start at 800-1600) – ISO controls how sensitive your camera is to light. A higher ISO captures more light, but too much will make the image grainy. Experiment with different values to find the right balance.
Use a Tripod for Stability
Since you’re using long exposure, even the slightest movement will cause blur. A small tripod for your iPhone is the best solution. If you don’t have one, stabilize your phone on a rock, backpack, or any steady surface to prevent motion blur.
Tips for Taking the Best Northern Lights Photos
Now that your settings are dialed in, let’s go beyond the basics and turn your photos into stunning works of art.
1. Find a Dark Spot
Artificial lights from street lamps, cars, or even a flashlight can wash out the aurora. The further you are from light pollution, the clearer and more vibrant the Northern Lights will appear in your photos. National parks, remote countryside areas, or even frozen lakes offer the best conditions.
2. Shoot in RAW
If you want more details, better colors, and flexibility for editing, switch to RAW format instead of JPEG. RAW files capture more light and color information, making them perfect for night photography. Since iPhones don’t have built-in RAW support in the default Camera app, use third-party apps like Halide or Lightroom Mobile to enable RAW shooting.
3. Experiment with Exposure
Not all Northern Lights displays are the same. Some are bright and fast-moving, while others are faint and slow. Adjust your settings accordingly:
- Brighter auroras? Use a shorter exposure time (5-10 seconds).
- Fainter auroras? Increase the exposure time (15-30 seconds).
Play around with different settings to find the perfect balance of brightness and detail.
4. Capture Some Foreground
A good Northern Lights photo isn’t just about the sky—it’s about composition. Adding a silhouette of a tree, mountains, or even yourself creates depth and storytelling in your shot. Experiment with angles and foreground elements to make your aurora photos more dramatic and engaging.
How to save Northern Lights photos on PC
Capturing the Northern Lights with your iPhone is an unforgettable experience, but what comes next is just as important, saving and backing up your photos safely. You don’t want to lose those once-in-a-lifetime shots due to accidental deletion, limited iPhone storage, or a cloud sync issue.
For a quick, reliable, and full-quality transfer, CopyTrans Studio is the best option. It allows you to move photos directly from your iPhone to your PC without compression, ensuring your stunning aurora shots stay just as sharp and vibrant as when you took them.

With CopyTrans Studio, you can:
- Transfer photos and videos in one click
- Access your iPhone and iPad Photos as if they were stored on a flash drive
- Organize your photos with Smart Albums
- Say goodbye to HEIC photos and convert them to JPEG
- Connect iPhone to PC via Wi-Fi
Download and install CopyTrans Studio.
Download CopyTrans Studio Now!Click on the CopyTrans Studio icon. Open the program.
Choose your iPhone and then click on Photo Library.
In the main window, you will see different options:
Option 1: backup the whole library in one click. Note: it does incremental backups without duplicates.
Option 2: open the “All photos” folder and copy images manually to the PC.
Option 3: choose between iPhone and iCloud photos.
Option 4: drag-and-drop photos separately by categories.
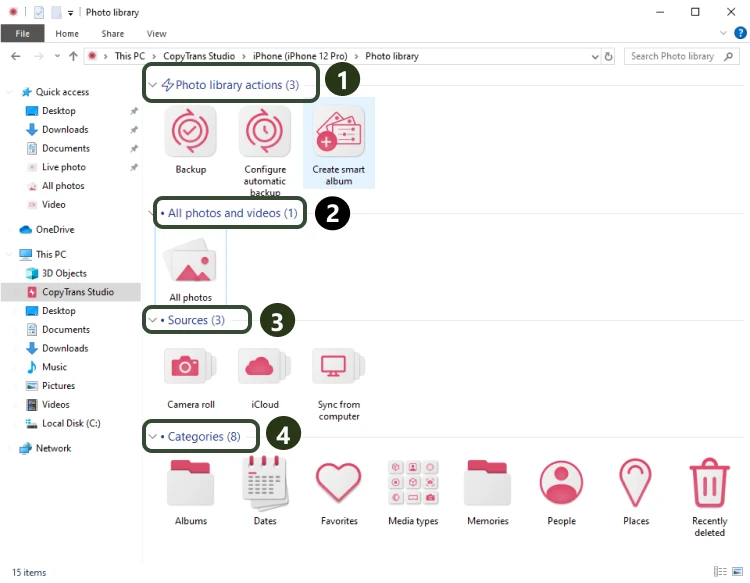
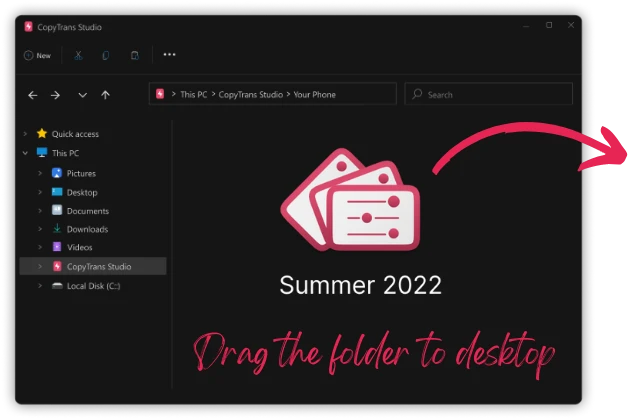
- The easiest way to save a few photos or a speical folder is to drag-and-drop photos to the computer.


Take pictures of the Nother Lights
FAQ
Can an iPhone really “see” the Northern Lights better than my eyes?
Yes, in some cases. Your iPhone’s Night Mode accumulates light for several seconds, allowing you to see green and purple hues that appear faded or even invisible to the naked eye, especially during low aurora activity.
Why do my photos of the Northern Lights look grey or faded?
This usually happens when the iPhone overexposes the sky. The aurora is bright compared to the darkness, not to daylight. Slight underexposure preserves contrast and prevents colours from becoming muddy.
Does cold weather affect the quality of the iPhone camera?
Not the lens but the battery. Cold weather drains the battery quickly, and when the battery level drops, the exposure time in night mode may be reduced. Keeping your phone warm between shots can improve the quality of your photos.
Should you use Live Photos when photographing the Northern Lights?
Yes, but not for the reason you might think. Live Photos allows you to select the sharpest frame after shooting, which helps when slight movement or wind causes micro-blurring during long exposures.
Is it better to shoot the Northern Lights in portrait or landscape format?
Landscape shots capture more of the sky, but portrait shots often enhance the “curtains” of the Northern Lights, making them taller and more dramatic — this is especially useful if the lights are directly overhead.
Can editing ruin a good photograph of the Northern Lights?
Absolutely. Overdoing the saturation can make the Northern Lights look unreal. The best edits focus on contrast, black point, and subtle temperature adjustments not turning the sky into neon.
Take photos of Nothern Lights with iPhone
Final Thoughts
Photographing the Northern Lights with your iPhone is not easy but with the right settings, accessories, and a bit of patience, you can capture stunning images that do justice to this breathtaking phenomenon. From choosing the best locations and conditions to adjusting your camera settings for long-exposure shots, every step plays a crucial role in preserving the beauty of the aurora.
But capturing the perfect shot is only half the journey. To ensure your photos remain high-quality and easily accessible, transferring them to your PC is essential. Using CopyTrans Studio, you can save your images in full resolution without compression or cloud storage limitations, allowing you to edit, print, and share your Northern Lights memories exactly as you experienced them.
Whether you’re chasing the aurora for the first time or refining your photography skills, these tips will help you make the most of the experience. So pack your gear, head to the darkest skies, and get ready to capture nature’s most mesmerizing light show! 🌌✨