Sometimes the simplest tasks create the most unnecessary friction. You need to circle something in a screenshot, scribble a quick note on a photo, or highlight a detail before sending your feedback, but the drawing tool is buried somewhere, and it all ends up taking longer than you planned. The need itself couldn’t be simpler: draw on a photo on iPhone and move on.
This guide shows you how to do just that using the tools built into your iPhone. No extra apps, no workarounds. You’ll learn how to use the native Markup tool, add text or drawings directly to any image, and get more precise control when you need it.
- Drawing on a photo iPhone: Markup tool
- Instantly draw on a screenshot
- What can you do with the iPhone’s Markup feature?
- Why can’t I draw on my photo?
- Save photos with CopyTrans Studio
Drawing on a photo iPhone
using the Markup tool
The Markup tool is built into every iPhone and works right in the Photos app. Here’s how to use it:
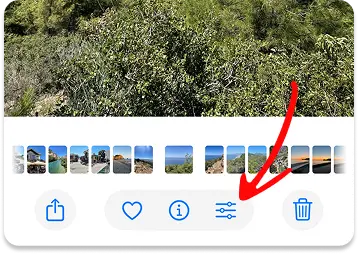
Open the photo you want to edit and Tap Edit (at the bottom of the screen).
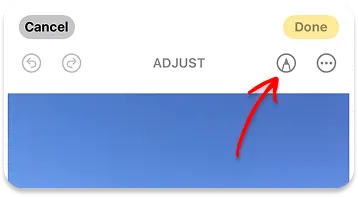
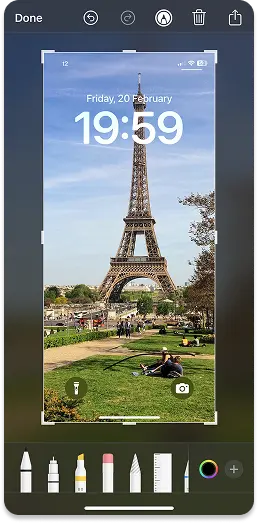
Open Markup: the pencil icon in the upper right corner
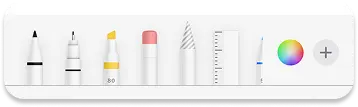
The Markup toolbar will appear at the bottom of the screen. Select a drawing tool: pen, marker, and pencil. Each of them works in its own way. Tap the tool that is right for your task.
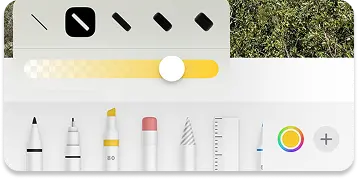
Adjust the color and thickness. And draw on your photo.
Save your changes. When you are satisfied with the result, tap Done in the upper right corner, then Save to Photos. Your edited image is saved as a new version. The original remains accessible if you want to go back.
Instantly draw on a screenshot
The fastest way to draw on image on iPhone, without having to open the Photos app.
Take a screenshot. Press the side button and the volume up button simultaneously (or the side button and the home button on older models)
Tap the thumbnail. A preview will appear in the lower left corner. Tap it immediately to open the screenshot directly in the Markup app.
Draw on your screenshot. Use the pen, highlighter, pencil, shapes, or text tools to add annotations.
Save or share. Tap Done → Save to Photos. That’s it.
What can you do with the iPhone’s Markup feature?
Drawing is just the beginning. The Markup feature offers several other tools that are worth knowing about.
Freehand drawing: draw whatever you want directly on the photo using your finger. Switch between pen, highlighter, and pencil depending on the line you want to create.
Add text: tap the plus (+) icon on the right side of the toolbar and select Text. A text box will appear on the image. Double-tap it to type text, then drag it to the desired location. You can change the font, size, and color using the options that appear below.
Add shapes: in the same plus menu, select a shape: arrow, rectangle, circle, speech bubble, and a few others. Once placed, you can resize it by dragging the handles and reposition it by dragging the shape itself. It’s much cleaner than trying to draw shapes by hand.
Add a signature: this feature surprises a lot of people. Markup lets you create and save your own signature, then drop it onto any image. Go to the more menu and tap Signature. You can draw a new one with your finger or use a signature you’ve saved previously.
Use the magnifying glass: also in the More menu, the magnifying glass places a circular lens on your photo that enlarges a specific area. You can adjust the size of the lens, the zoom level, and add a colored border around it. This is useful when you need to draw attention to a small detail without covering it up.
Pro tips for better drawing on iPhone
Once you’ve mastered the basics, a few small habits can make a big difference in how you draw.
Zoom in before you draw: pinch to zoom in on the area you want to annotate before picking up the stylus. It seems obvious, but most people skip this step and end up with shaky, imprecise lines. Zooming in gives you better control over where your lines go.
Use the Shapes tool instead of drawing circles freehand: Freehand circles are almost never neat. Instead, draw a rough circle or rectangle, then hold your finger still at the end of the stroke: the iPhone will automatically convert it into a perfect shape. You can then resize it and reposition it exactly where you want it.
Adjust the opacity for highlights: if you want to highlight text or an area without covering it completely, reduce the opacity of the selected color using the color picker in Markup. This creates a much cleaner highlighting effect than drawing a thick line over something.
Use the ruler to draw straight lines: the ruler tool in Markup is easy to miss, but really useful. Place it on the canvas, adjust the angle with two fingers, and draw along the edge to get perfectly straight lines every time.
Why can’t I draw on my photo?
If the drawing option doesn’t appear, it’s often because of a small detail. Here’s what to check.
The Markup option doesn’t appear at all: open a photo, tap Edit, then look for the three-dot menu (···) in the upper right corner. The Markup option is sometimes found in this menu rather than in the main toolbar. If you still don’t see it, try opening the photo in the Files app. Its behavior can sometimes be different from that of the Photos app.
iOS may need an update: older versions of iOS have limited markup features or display them differently. Go to Settings → General → Software Update and see if an update is available. A quick update usually solves most of the problems.
The photo is in a Shared Album: photos in shared albums are often locked for editing. First, save the photo to your own library, then try again.
Editing is restricted on your device: if you are using a managed device (at work or school), editing features may be disabled by an administrator. Check with the person who manages the device settings.
The file format is not supported: some images or screenshots downloaded from certain apps are saved in formats that are not compatible with Markup. Try saving the image again or taking a new screenshot before editing it.
Save photos with CopyTrans Studio
If something happens to your device (like an update fails, you run out of storage, or it crashes unexpectedly), the original photo and your edits could be lost. That’s why it’s important to regularly back up your images to a PC. Transferring your photos to your computer allows you to keep your drawings, notes, and highlights safe and in optimal quality, stored securely somewhere other than on your phone.
- Download and install CopyTrans Studio. Download CopyTrans Studio
- Click on the CopyTrans Studio icon. Open the program.
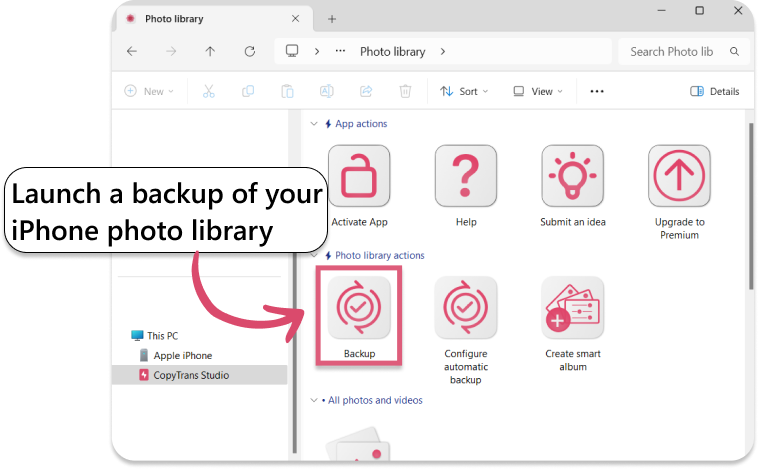
- Here you see the icon of your iPhone. Choose it and then click on Photo Library.
- Open choose the option “Back up” and all photos will be saved on you PC. Or just find the photo you need and drag-and-drop it.


Detailed guide on how to transfer photos from iPhone to PC
How to draw on pictures on iPhone
FAQ
1. Does drawing on a photo reduce its quality on the iPhone?
No, the image quality remains the same. The Markup tool adds a layer of edits on top of the original photo without compressing it. However, once saved, the drawing becomes part of the image, unless you revert to the original.
2. Does drawing on a photo reduce its quality on the iPhone?
Yes. Before editing the photo, duplicate it in the Photos app. This will allow you to draw on the copy and keep the original intact. This feature is particularly useful for annotating screenshots or important documents.
3. Why do my drawn lines look shaky or uneven?
Drawing with your finger may seem less precise, especially on small screens. Zooming in while editing improves accuracy. You can also use the Shapes tool instead of freehand drawing to get cleaner circles, arrows, or straight lines.
4. Can I move an element that I have already drawn on a photo?
If you use freehand drawing, it becomes final once applied. However, text boxes and shapes can be selected and repositioned before being saved. For flexible editing with movable layers, a third-party application may be more suitable.
5. Will my drawings be synced across all my Apple devices?
If iCloud Photos is enabled, the edited version will automatically sync to your other Apple devices. Keep in mind that the synced version includes your drawings, unless you revert to the original image.
6. What happens to my drawings if I transfer the photo to a PC?
When you transfer the edited image to a computer, the drawings remain embedded in the file. They do not disappear and retain their full resolution. This is why it is important to back up annotated photos if they contain important notes or visual explanations.
Draw on Photos iPhone
Final Thoughs
It’s as simple as that. With just a few clicks, your photo will express exactly what you want it to. Markup adapts to most situations: circle, highlight, add text, quickly draw an arrow. The app is already installed on your phone, it works well, and after using it once or twice, you won’t even have to think about it.
If you encounter something it can’t do, that’s also worth knowing. More detailed edits, custom lettering, layered annotations: that’s where dedicated apps come in. But most of the time, you won’t need to go that far. The next time you need to draw something, you’ll know exactly where to go.