Have you ever looked up at the night sky, seen a bright full moon, and thought, “I have to capture this”? You grab your iPhone, take a photo, and end up with… a blurry white dot. No craters, no texture, nothing that made the moment special. Disappointing? Absolutely. Irreparable? Not at all.
The moon is an enticing subject, but it’s also a challenging one, especially for an iPhone camera, which tends to overexpose bright objects. Luckly with a few simple adjustments and the right approach, you can take a picture of the moon that’s much closer to what you see with your eyes.
In this guide, we’ll look at practical iPhone camera settings and give you tips to help you take clearer, more detailed photos of the moon without any extra equipment. And once you’ve taken a great shot, we’ll also show you an easy way to transfer and save your moon photos to your PC.
- Can you really take good pictures of the moon with an iPhone?
- What you actually need to take photos of the moon with an iPhone?
- How to take a picture of the moon with iPhone?
- How to Save Moon Photos from iPhone to PC?
Can you really take good pictures of the moon with an iPhone?
Short answer: Yes, you definitely can!
But let’s be honest, it’s not just a matter of pointing your phone at the sky and snapping away. The moon may look big and bright, but it’s actually a pretty tricky subject. Between its distance, brightness, and the dark sky around it, capturing a great shot takes a bit of finesse.
Your iPhone is more capable than you think
If you’re using an iPhone 11 or newer, you’ve already got a surprisingly powerful camera in your pocket. These models come with advanced lenses, Night mode, and smart image processing, all of which come in handy when you’re shooting in low light.
Night mode automatically adjusts exposure so your phone gathers more light, while computational photography cleans up the image, sharpening details and reducing that fuzzy digital noise. In short, your iPhone is working overtime behind the scenes to help you get the best possible shot of the moon.
Don’t expect magic, it’s not a DSLR
Here’s where we keep it real: your iPhone won’t outshine a DSLR with a telephoto lens. A professional camera setup can capture crisp surface details that make the moon look like you could reach out your hand and touch it.
But that doesn’t mean your iPhone can’t produce something beautiful. With the right settings, a steady hand (or a tripod), and a bit of patience, you can absolutely take share-worthy, print-worthy moon photos. Think of a glowing moon against a rich night sky — not NASA-level detail, but still very cool.
What you need to take photos of the moon with iPhone?
Before you rush outside to take a photo of the moon in all its beauty, a little prep goes a long way. Moon photography isn’t about fancy gear, it’s about using what you’ve got smartly. Here’s what will make a real difference:
- An iPhone 11 or Newer: the newer your iPhone, the better your chances. iPhones from the 11 and up have upgraded sensors, better Night mode, and more powerful image processing. They also come with improved zoom and stabilization, two features that make it easier to lock onto that glowing orb in the sky.
- Tripod (or anything that keeps your phone still): shaky hands and moon photography do *not* mix. Even the slightest movement can turn a promising shot into a blur. A small, adjustable tripod built for smartphones is ideal, but if you’re tripod-less, no worries. Place your phone against a wall, a table, or even a stack of books. Stability is the goal.
- Optional: a clip-on zoom lens: want more detail, like craters and surface textures? Consider picking up a clip-on zoom lens. It won’t turn your iPhone into the Hubble, but it will help bring the moon closer and sharpen the detail. These lenses are lightweight, inexpensive, and snap right onto your phone.
- A clean lens (seriously): smudges = blur. Before you start, take a second to gently clean your iPhone’s lens with a soft, lint-free cloth. It’s an easy step that can make a huge difference, especially when you’re trying to capture fine details.
How to take a picture of the moon with iPhone?
Capturing a stunning photo of the moon with your iPhone is absolutely possible, and you don’t need sophisticated equipment to do it. With just a few simple techniques and the tools already in your pocket, you can turn that blurry white dot into a crisp, glowing orb. Here’s how to get started.
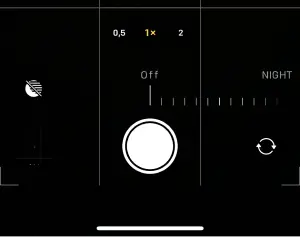
- Open Photo Mode and point your camera at the moon. The Night mode should be activated automatically (from iPhone 11 and newer models).
- Lock Focus and Exposure: tap and hold on the moon until “AE/AF Lock” appears. This prevents the camera from refocusing as you adjust your shot.
- Reduce Exposure: slide your finger downward on the screen to darken the image. This helps bring out the moon surface features and avoids that common white-glow effect.
- Zoom in (but not too much): use the optical zoom (2x or 3x if available). Digital zoom can degrade the image, so use it moderately.
- Stabilize the Camera: a tripod or even a stable surface makes a big difference. To avoid any movement when pressing the shutter, use the built-in timer.

Bonus: pro tips to take your moon photos to the next level
Even with great camera technique, a few extra tricks can help you capture truly stunning images.
- Time your shot during Golden Hour or when the moon is close to the horizon. This softens the light and adds richness to your photos.
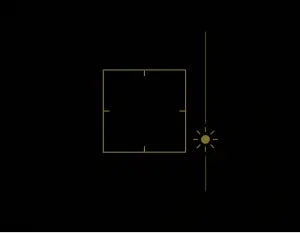
- Use the camera grid (can be enabled in Settings) to apply the Rule of Thirds. Try positioning the moon off-center for a more balanced, artistic composition.
- Shoot in Burst Mode to take a series of shots in quick succession, this boosts your chance of getting one perfect frame.
- Use clip-on zoom lenses if you want extreme close-ups, but make sure they align precisely to avoid blurry edges or dark corners.
Once your photo is taken, don’t stop there. With just a little editing, you can bring out the full beauty of the moon in your shot.
How to save Moon Photos from iPhone to PC?
After capturing the perfect moon photo on your iPhone, the next step is making sure it doesn’t just sit in your Camera Roll. Saving it to your PC not only keeps it safe but also makes editing and organizing much easier, especially if you’re building a collection of moon shots.
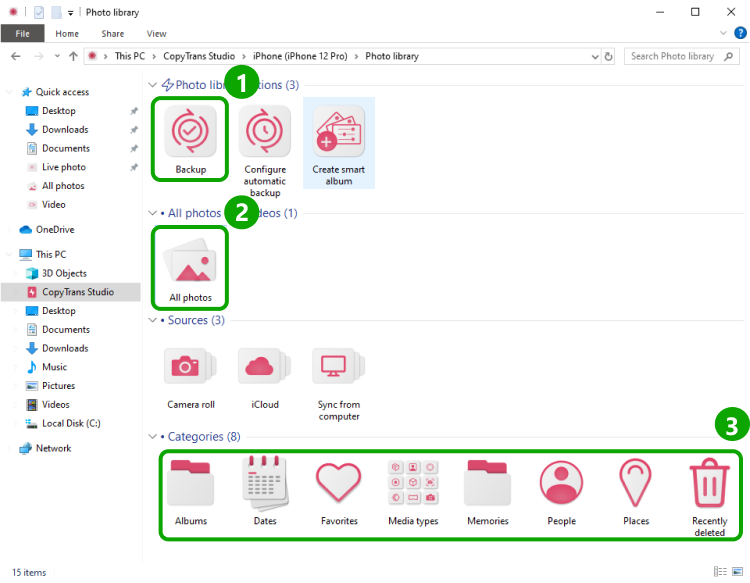
- Download and install CopyTrans Studio. Download CopyTrans Studio
- Click on the CopyTrans Studio icon. Open the program.
- Choose your iPhone and Photo Library
- There are a few options to save your photos.
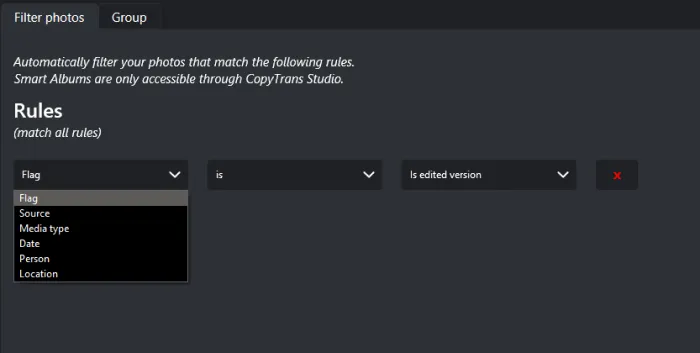
- To save edited photos on your PC, find the pics and drag-and-drop them to your PC or use the Smart Album function.


How to take moon photos with iPhone?
FAQ
1. Why does the moon always look like a tiny white spot in my photos?
Because your iPhone is trying to “correct” the lighting for you. The moon shines very brightly against the dark sky, so the camera amplifies the shadows and overexposes the moon. The solution? Tap on the moon to focus, then swipe down on the screen to manually reduce the exposure. Suddenly, the spot becomes the moon again.
2. Do I need a tripod, or can I shoot handheld?
You can shoot handheld, but a tripod (or even resting your phone on a balcony, bottle, railing…) makes a huge difference. The iPhone uses a longer exposure at night, and even slight hand movements can turn your moon into a softly glowing potato.
3. Which iPhone camera is best for photographing the moon: wide angle, telephoto, or the trendy 5x zoom?
Always choose the longest optical zoom your model offers. The 5x lens on the new Pro models is ideal. Digital zoom also works, but only in moderation, otherwise, the moon will look like it was drawn in Microsoft Paint.
4. Should you use night mode to photograph the moon?
Not always. Night mode brightens the entire scene, which is great for landscapes but not for the moon itself. Sometimes turning off night mode results in a clearer and more expressive moon. Try both options — the difference is huge.
5. Is there an ideal time to photograph the moon?
Yes: when the moon is low above the horizon. It looks bigger, warmer, and is much easier to expose. In addition, haze or clouds can add texture and drama rather than spoiling the shot. Apps for viewing moonrise will help you capture the moment without guesswork.
6. Can you improve the quality of moon photos without obvious “overprocessing”?
Absolutely. A little clarity, a little sharpness, and a little contrast go a long way. Don’t drag the structure slider all the way to the max unless you want the moon to look like a cheese grater. Subtle processing preserves the natural look.
How to take a good picture of the moon on iPhone?
Final Thoughts
Taking pictures of the moon isn’t just for professional photographers, it’s something anyone can try, even with a smartphone. If you’ve ever wondered how to take moon photos with iPhone, the good news is, it’s easier than you might think.
All you really need is a bit of patience, a steady hand (or a tripod), and the right timing. Lock the focus, lower the exposure a little, and let the moon do the rest. Don’t worry if your first shots aren’t perfect, part of the fun is experimenting and seeing what works best.
So next time you spot a bright full moon in the sky, take a minute, grab your iPhone, and give it a try. You might be surprised by the kind of photos you can capture, no fancy camera required.