Live Photos look great on your iPhone, but when shared outside of the Apple ecosystem, they often turn into static images and lose the movement that made the moment so special.
Apple Live Photos capture more than just a single image. Each photo contains a short video clip that adds context, emotion, and movement. The problem? That video isn’t always easily accessible or shareable. That’s why converting a Live Photo to a regular video can make a big difference. Whether you’re posting something on social media, sending clips to Android users, or editing footage for a project, converting to video ensures that everyone sees what you intended. You can share the moment anywhere and use your Live Photos in any video app.
In this article, you’ll learn how to turn a Live Photo to a video on your iPhone with just a few taps.
- How to make a Live Photo a Video on iPhone
- How to save multiple Live Photos as video with CopyTrans Studio
- How to Edit Live Photos
- Storage Space for Live Photo and Videos
- Live Photo to GIF
How to make a Live Photo a Video
Now that you have your Live Photos ready, let’s dive into the steps to convert them into videos on your iPhone:
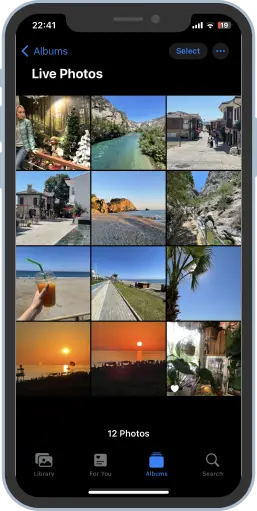
- Open the Photos app on your iPhone, and find a Live Photo you would like to convert.
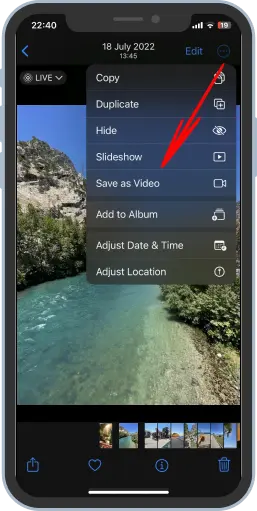
- Open Live Photo, revealing the dynamic elements it contains. Tap on three dots in the right corner of the screen and choose the option “Save as video”.
- Now your Live photo is saved as a video: you can see it in your iPhone’s gallery next to the original file.
The problem is that with this method, you can only convert Live photos one by one. It would be too time consuming if you need to bulk convert multiple live photos to video. To do so, use CopyTrans Studio: with this tool, you can save you Live photos as video, image or both.
How to save multiple Live Photos as video
With CopyTrans Studio
You might want to turn a bunch of Live photos into a video at once: it is a great way to save and share your memories as videos, or post them on social media. Here is how to do it with CopyTrans Studio which is specially designed to manage various types of iPhone media files.
- Download CopyTrans Studio and install it. For the first connection to the program, connect your iPhone to PC with USB cable. Download CopyTrans Studio
- Click on the CopyTrans Studio icon. Open the program.
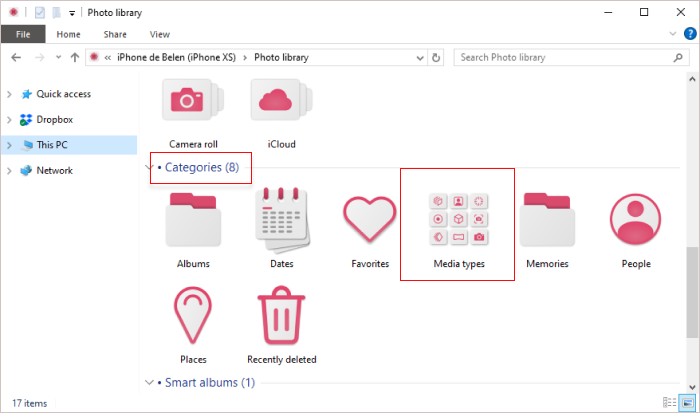
- Select your iPhone and choose “Photo Library”.
- Now, to find Live Photos here, you should find “Categories” and click on “Media Types”.
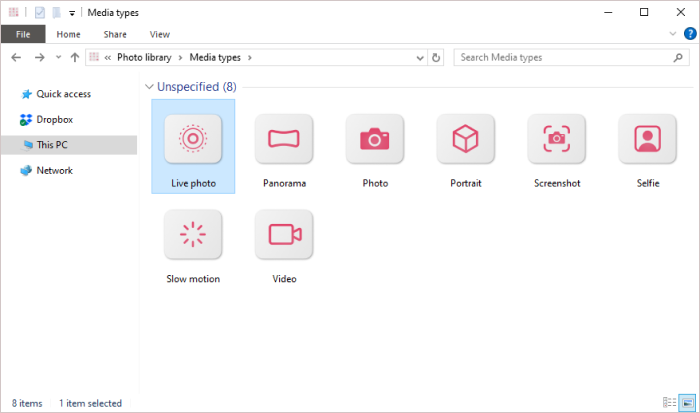
- Now you can see the “Live Photo” folder. Double-click on it to access all Live photos from your iPhone.
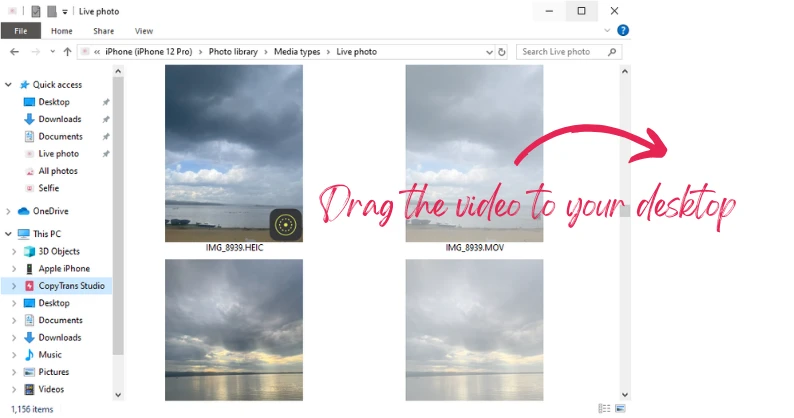
- To save all iPhone Live photos as videos on your PC, drag the whole album to your Desktop to save all Live photos at once (both image and video part). Then, to keep only videos, open the folder in Windows Explorer, do a right click and select “Sort by”. This way, Explorer will group still images and video files coming from your Live photos. Once the sorting is done, you can select all image files and delete them.
- If you want to convert selected Live photos to videos, access the Live photo album in CopyTrans Studio and find the files you want to save. Select the video part (with the .mov extension) and drag it to your desktop to save. You can then share this file on social media.
- Another way to save Live Photos is to use Smart Albums. It is a unique feature in CopyTrans Studio that allows user make highly customized albums with iPhone photo. For example, you can save Live photos from a selected date range, location, or with specific people.

To do so, select “Create Smart album” in the main menu. Then, select the proper criteria: choose “Media type is Live Photo” to save only Live photos. Add other parameters if necessary.
You can find a detailed guide in the article about how to use Smart Album feature.

How to edit Live photos
Before you turn your Live Photos into videos, it’s good to know what makes them look cool. Check out these unique features that can make your videos stand out. Use one of the settings below and your video will have a special effect. Then you can use CopyTrans Studio to save these videos on your PC.
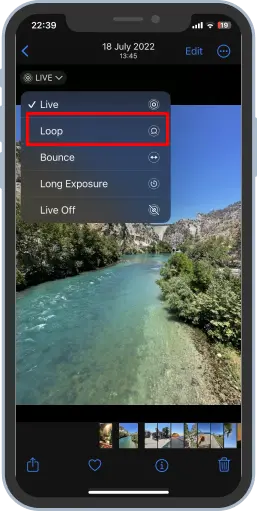
- Loop: This effect creates a continuous loop of the Live Photo, resulting in an engaging video that plays the action or movement on repeat, like an endless cycle. This option helps you to turn your photo into a GIF.
- Bounce: The Bounce effect provides a boomerang-like motion by playing the Live Photo forward and then in reverse, adding a unique touch to your videos.
- Long Exposure: This effect transforms your Live Photo into a stunning still image with dynamic elements, simulating the effect of a long exposure shot.
- Live Off: This helps you to turn off the Live Photo effect.
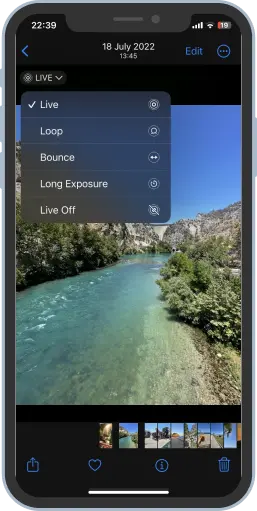
How to use one of these effects? Easy! On your Live Photo choose the option “Live” in the left corner of the image. In the drop-down menu, choose the effect. And that’s all. But remember, that this feature will update the photo and won’t save its duplicate. But you can always change the setting of the photo on your iPhone.
The Photos app on your iPhone offers basic editing tools to enhance your Live Photos before converting them to videos. You can crop, adjust brightness and contrast, apply filters, and make other edits to ensure your video looks its best. Simply tap on the “Edit” option when viewing the Live Photo to access these editing tools.
Storage Space for Live Photo Videos
Converting Live Photos into videos can have an impact on your iPhone’s storage space. Live Photos consume more space compared to regular photos due to the video components they include. When converting Live Photos into videos, it’s important to ensure you have enough storage available on your device.
To optimize storage and make room for Live Photo videos, you can consider the following options:
- Regularly transfer and backup your photos and videos to a computer or cloud storage service.
- Delete unnecessary Live Photos or regular photos/videos that are taking up too much space.
- Enable iCloud Photos to automatically store your photos and videos in the cloud, reducing the local storage usage on your iPhone.
By managing your storage effectively, you can create and store Live Photo videos without worrying about running out of space on your iPhone.
Live Photo to GIF
If you prefer to create GIFs from Live Photos rather than convert them to videos, you can do so on your iPhone. GIFs are a fun way to bring Live Photos to life and share them on social media or messaging apps. You can also customize the speed and duration of the GIF according to your preferences. Creating GIFs from live photos is a creative way to add motion to still images and make them more interesting.
To turn a Live Photo into GIF, open the photo you want to convert and swipe up to open the effects options. Select the “Loop” effect to create a GIF from a live photo
Once you create a GIF from a live photo, you can save it in Camera Roll and share it with others. Available on iPhone with iOS 13 or later, this feature is a fun and interactive way to share live photos with friends and family.
How to make a Live Photo a video
FAQ
Will converting Live Photo to video reduce its quality?
Usually not. When you save Live Photo as a video on your iPhone, iOS uses the original frames captured by the camera. The resolution remains close to the original, but compression may occur if you later share it via messengers or social networks.
Why does the Live Photo video seem shorter than I expected?
Live Photo only records about 1.5 seconds before and after you press the shutter button. When you convert it to video, you only get that snippet. If it seems longer in your memory, it doesn’t mean that frames are missing — it’s just a feature of Live Photos.
Can I choose a different moment as the “main” part of the video?
Yes, and this is important. Before converting, open Live Photo, tap “Edit” and set the key photo. The key frame affects how the video starts and is perceived, especially if you plan to share it or crop it later.
Why doesn’t “Save as Video” appear for some Live Photos?
This usually happens if:
- Live Photos is disabled for that image (it was taken as a still image)
- The file was imported or edited in a way that removed the Live data
- iCloud has not yet fully downloaded the original file
Wait for the download to complete or check if the “LIVE” tag is active.
What is the best format for sharing a Live Photo video outside the Apple ecosystem?
After conversion, the video becomes a standard MOV file. This is ideal for sharing with Windows users, uploading to social media, or backing up on a PC—without the need for special apps.
Should I convert Live Photos before backing them up?
If you want to view them on non-Apple devices, yes. Live Photos are based on Apple’s format. Converting them to videos ensures that the motion part is not lost when transferring or storing them outside of iOS.
Live Photo to video
Conclusion
So basically, being able to turn Live Photos into videos is a total game-changer in multimedia storytelling. It lets us unleash the full potential of our captured moments and turn them into awesome video stories. Instead of just posting a boring old still image, now we can share a whole experience that really brings our memories to life.
Just follow the steps in this guide and you’ll be able to easily convert your Live Photo into video that is ready to share with others. Also, you can use CopyTrans Studio to save all your Live Photos into videos without using your iPhone storage! Just save them on your PC in a few clicks.
Make sure to check out all the different video quality options while you’re converting your Live Photos to get the best result. You can enhance the visuals and sounds to make the experience even more immersive for your viewers while still keeping the essence of the moment intact.
Now, bring your Live Photos to life by turning them into videos and sharing your stories in a whole new way. Let your imagination run wild as you show off your experiences, feelings, and adventures to others through the amazing world of video. Happy video-making!