When I decided that it is time to back up all my iPhone photos to PC, I found out that my Photo Library is huge. It has almost 60 000 photos and videos. That is why I needed an easy, fast, and reliable way to save them on my computer. I did some research on Google and found out that there are several ways to do so. Which one to choose? I decided to test them all myself. In this article, I will show you different photo backup methods and will help you choose the best solution so far!
How to choose the best photo backup method for iPhone?
When you back up photos from your iPhone to your PC, remember this factors:
- Storage Space: Check that your PC or online storage has enough space for all your photos you want to back up.
- Connection Method: Decide how you will connect your iPhone ещ PC. You can use a USB cable or choose wireless methods such as iCloud, Google Photos, or other cloud storage services.
- File Format: Look if file format of the backed-up photos is compatible with your PC. Most commonly, photos are backed up in formats such as JPEG or HEIC. Be sure that your PC software or photo viewer can handle these formats.
- Organization: Think about how you want to organize your backed-up photos on your PC. You can create specific folders or albums to categorize your photos for easier navigation and retrieval.
- Security: Prioritize the security of your photos during the backup process. If you are using cloud storage services, ensure that your account has a strong password and enable two-factor authentication for added protection.
- Check for Duplicates: Take the opportunity to remove duplicate photos during the backup process. This will help to save storage space on your PC and keep your photo library well-organized.
- Regular Backup Routine: Establish a regular backup routine to. By regularly backing up your photos from your iPhone to your PC, you minimize the risk of losing cherished memories in the event of device damage, loss, or theft.
Take into account these important factors and you will successfully backup your photos from your iPhone to your PC, providing peace of mind and easy access to your precious memories.
But what is the best way to back up your photos? Let’s deep into this question and we will help you to find it out!
How to back up a lot of iPhone photos: 2 main methods
As you can imagine, today you can choose how to back up photos out of different methods. We can divide them into 2 groups:
- Manual Backups to PC: you can use different kinds of software that usually installs on your PC and backs up photos locally or to an external drive. It allows you to have complete control over the backup process and is useful for users who prefer a hands-on approach. It is also a good way to avoid using iCloud. Here are the methods: CopyTrans Studio, iTunes, DCIM folder.
- Cloud-Based Services: Cloud storage services, such as Google Photos, iCloud, or Dropbox, allow you to upload your photos to remote servers via an internet connection. This method offers the convenience of accessing your photos from any device with an internet connection and provides advanced synchronization options.
Each backup method has its advantages and considerations, including cost, accessibility, storage capacity, and level of automation. It is essential to evaluate your specific needs and preferences to determine which method or combination of methods will best protect and preserve your photo collection.
And now, we will show you all theses ways to back up your photos!
Option 1: Full Backup to PC with CopyTrans Studio
What’s the most important thing about a photo backup for you? For me, to do a backup quickly is a key, in just a couple of clicks. Here I show how to copy the full iPhone photo library to Windows PC in just a few steps.
Advantages of this method
- save your entire library where you want;
- saved files are available at any moment;
- customizable: convert HEIC files to JPEG or rename files on transfer;
- Download and install CopyTrans Studio.
- Click on the CopyTrans Studio icon. Open the program.
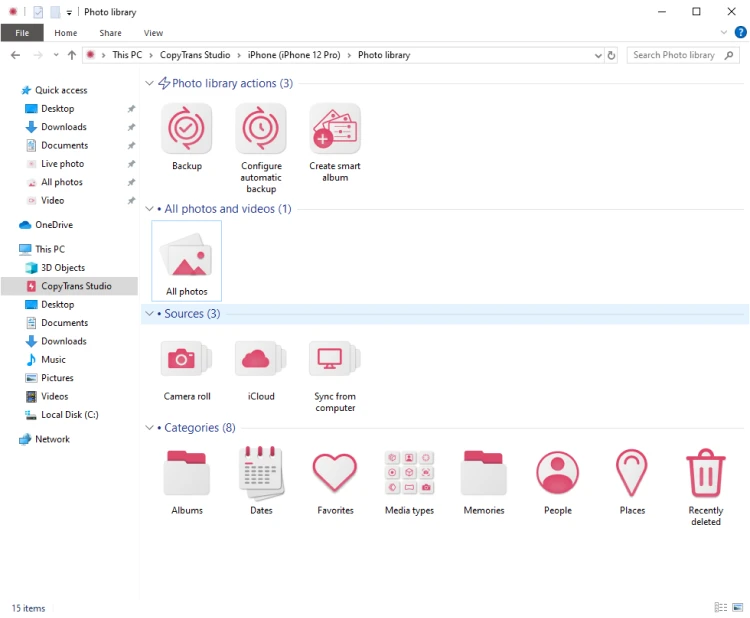
- Now you can open your iPhone Photo Library:
- Then, select “Backup”.
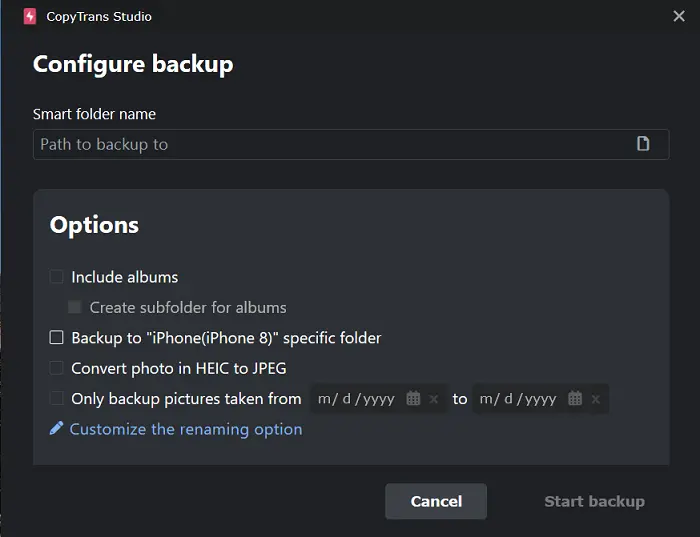
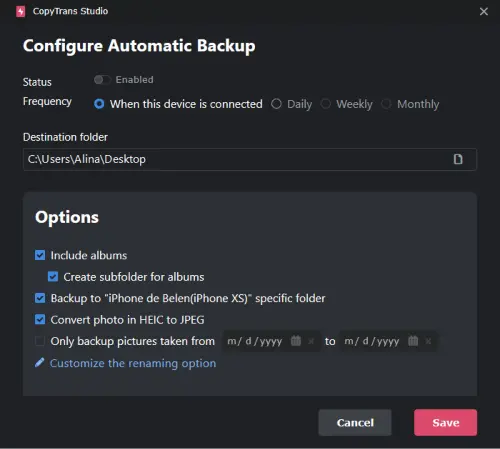
- You can start a backup right away or configure it according to your needs:
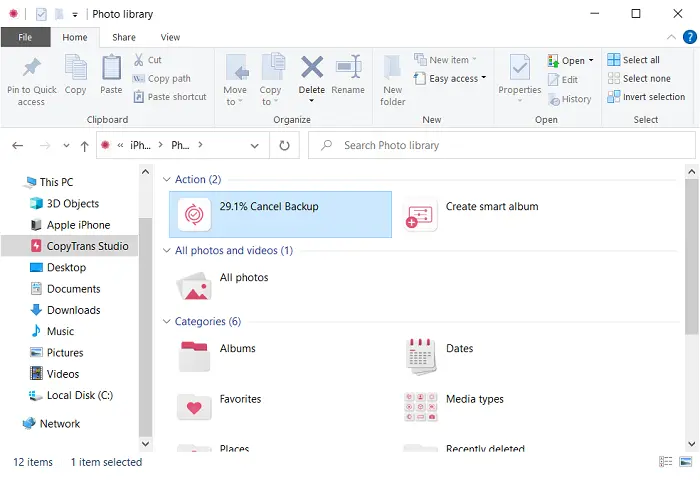
- Start Backup and CopyTrans studio will make it for you. NOTE: you can also cancel the backup by double clicking on the Cancel Backup option:
- That is it! Wait until the backup ends and don’t disconnect your iPhone before that.


Smart Folder name: Choose the backup destination
Include albums: This option means that not only photos from Camera Roll will be saved, but also all the albums that you created on your iPhone
Backup to “iPhone (iPhone8)” specific folder: All the photos will be saved in the folder with this name and only then you will find all the folders inside it
Convert HEIC to JPG: It will automatically save the images in JPG format that is compatible with Windows
Only backup pictures from…: This option will be useful if you would like to save photos of a specific period of time.
Customize the renaming option: Choose the folder name. Just add the options, and don’t forget to add this symbol between the properties: \ . Click on Save after you finish.

Why CopyTrans Studio is also good for your iPhone photos?
- Don’t have to back up everything – you can save only the photos and videos you need
- Simple: does back up in a few clicks
- No duplicates – CopyTrans Studio copies only what hasn’t been copied before
- Intuitive interface with drag-and-drop function
- Automatic backups
- Convert and view HEIC photos on your Windows PC
- Create customized photo albums with the Smart Album function
Option 2: Wireless Backup with CopyTrans Studio
While traditional methods like transferring photos to a computer with a USB cable still exist, wireless photo backups offer convenience and ease of use. CopyTrans Studio has this feature: it allows wireless access to iPhone photos from Windows. You can set up connection via Wi-Fi and also configure Automatic Backup every time iPhone is connected to PC. Follow the steps below:
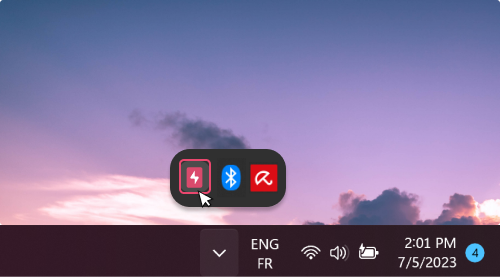
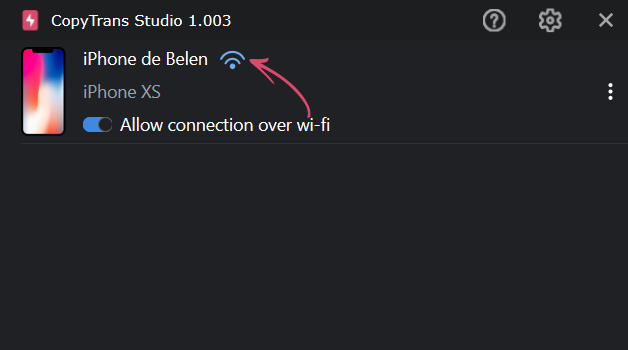
- After you downloaded and installed CopyTrans Studio, connect your iPhone via cable. Then, go to the system tray (bottom-right corner) and click on the CopyTrans Studio icon.
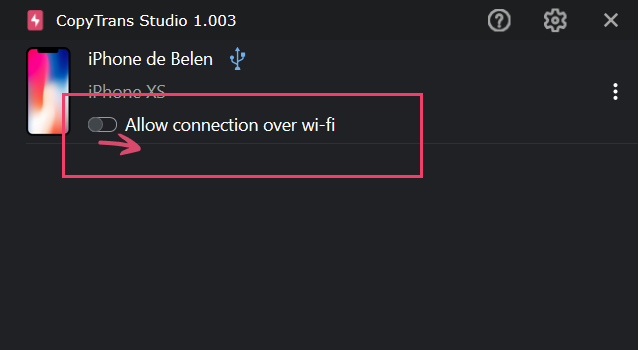
- After you find your iPhone in the list, allow connection over Wi-Fi by toggling this option.
- Unplug the USB cable from the computer and in a few moments you will see a Wi-Fi sign that means that now your iPhone is connected over Wi-Fi.
NOTE: please remember that to establish a wireless connection your iPhone and PC have to be connected to the same Wi-Fi network.
And now you are ready to set up your Automatic backup!
- After you open your iPhone Photo Library, click on the option “Configure Automatic Backup”
- Now you can enable automatic backup every time your iPhone is connected to CopyTrans Studio.
NOTE: all the backups will be made without duplicates, only the last changes.
Option 3: Back up photos with iTunes
iTunes is a native solution from Apple, so when we think about saving photos from iPhone to PC, iTunes is the first solution that appears. But is it the best?
The first thing you have to remember is that iTunes does only full iPhone backups. You won’t be able to extract your baked up photo library unless you restore the whole backup.
- Install iTunes and Connect Your iPhone to your computer using a compatible USB cable.
- After you open the program, select your device in iTunes and click on the Photos Section.
- In the “Photos” tab, you will find various backup options:
Sync Photos: Allows you to sync your entire photo library or specific albums from your iPhone to your computer.
Select Folder: This lets you choose a specific folder on your computer where you want to save your iPhone photos. - If you choose to sync photos, you can further customize the backup settings. For example, you can select whether to include videos, optimize storage on your device, or transfer full-resolution photos.
- Now start a backup by clicking the “Apply” button. Wait till your backup is finished.
- After the process is completed, verify if you saved all your photos. Find and open the folder with your Photo Library on your device.
Though, this method is a native Apple method but it has its disadvantages:
- can’t back up only photos, does full iPhone backups;
- can only back up photos that were taken with your iPhone, not albums that you’ve created on device;
- takes a lot of time and consumes a lot of RAM;
- does not back up photos that have already been synchronized with iCloud;
More infromation about iPhone photos in iTunes backup find in the article.
Option 4: Save photos via DCIM folder
Saving photos with the DCIM folder is a known hack among iPhone users. This folder contains all the photos and videos captured by your iPhone’s camera. It seems to be an easy way to access and save iPhone photos. However, it has some serious problems.
Is saving photos via DCIM a workable solution for photo backup?
- iPhone might not be detected by PC at all: if you connect via USB cable, iPhone will be treated as an external device that might have tons of connectivity issues;
- hard to find specific photos: the album structure is not preserved and there isn’t any coherent timeline;
- you cannot choose the photo format or convert it when transferring to PC;
- photo orientation is not respected;
- may have duplicates;
So, here is how to save photos with DCIM folder:
- Connect your iPhone to your computer. If your iPhone is not recognised, please find out the solution in our guide.
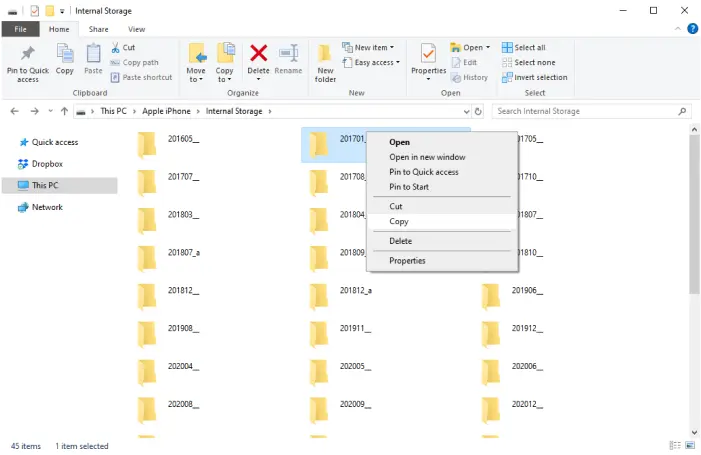
- Now open the File Explorer and locate your iPhone device. Click on your device to access its contents.
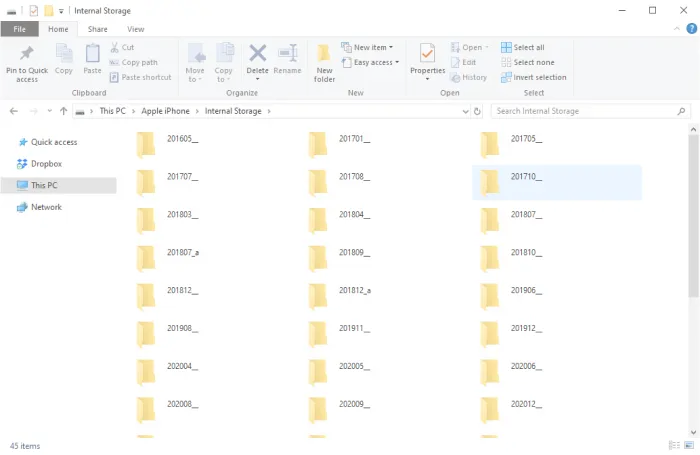
- Within your iPhone device, you will find various folders. Look for the “DCIM” (Digital Camera Images) folder. This folder contains all the photos and videos captured by your iPhone’s camera.
- Choose the DCIM folder (or open it select the photos and videos you wish to back up) and then right-click and choose the “Copy” option.
- Now open the folder where you need to save the photos. Right-click inside the folder and then choose “Paste”.

Congrats! You have successfully backed up your iPhone photos using the DCIM folder. Remember to repeat this process from time to time to ensure you have the most up-to-date backup of your precious memories.
Option 5: Use Windows Photos App
The Windows Photo App, available on Windows 10 and 11, is a tool for managing and viewing your photo collection. It synchronizes your iPhone photos with Windows and might save as a photo backup tool. Here is how to use it:
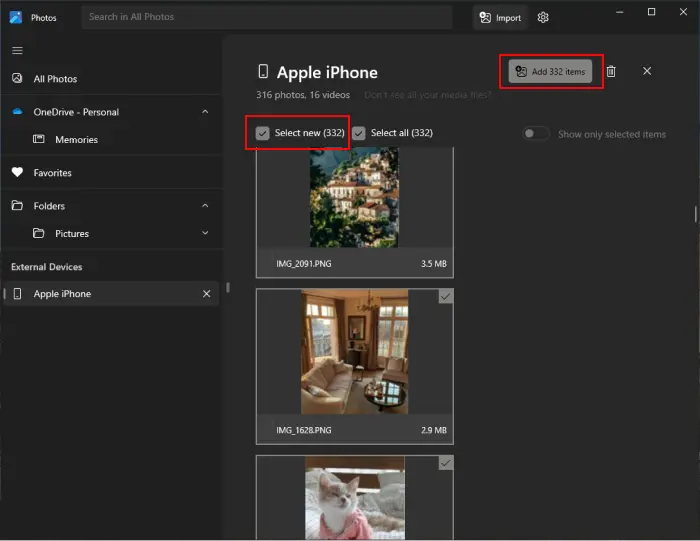
- Connect your iPhone to PC and in the Start menu in Windows, choose the “Photos” app. Or find it in the search bar.
- Select the pictures you want to import to Windows 10, then click on the “Add” button to start the process
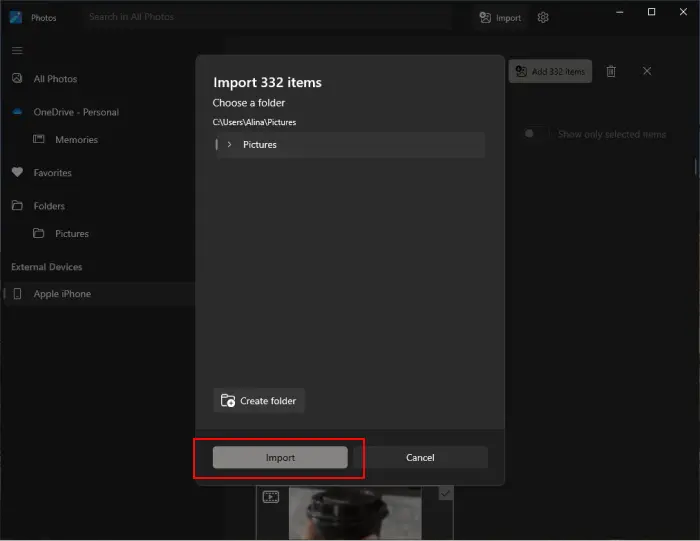
- Choose the folder to save the photos and click on “Import”
- That’s it, the photos will be saved in the folder on your PC
Disadvantages of Windows Photos App
- album and folder structure are not retained;
- Live Photos without live photo effects;
- HEIC photos are not displayed after importing;
- no rotation;
Option 6: Import photos to iCloud
iCloud Photo Library is a feature offered by Apple that allows you to store and sync all your photos and videos across your Apple devices. With iCloud Photo Library, your photos and videos are automatically uploaded to iCloud and you can access them from your iPhone, iPad, Mac, or even on the web.
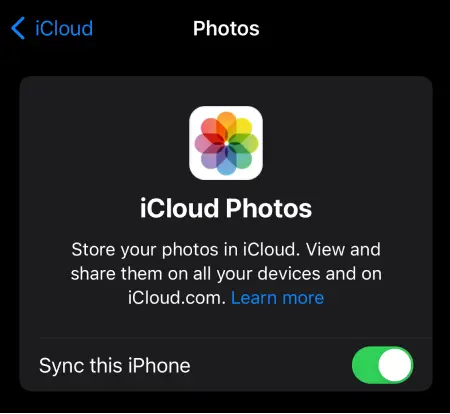
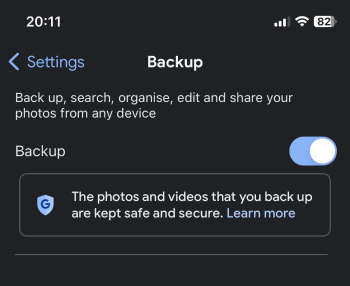
Before you back up your photos to iCloud, make sure iCloud Photo Library is enabled on your device. Here is how to do it:
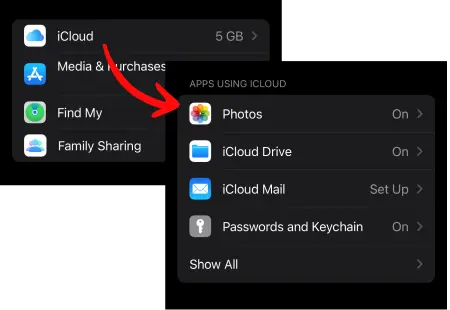
- Open the Settings app on your device. Tap on your name at the top of the screen.
- Select “iCloud” and then “Photos.”
- Toggle on the “Sync this iPhone” option.

Once you have iCloud Photo Library on, your photos will be automatically backed up to iCloud. Follow these steps to ensure your photos are properly backed up:
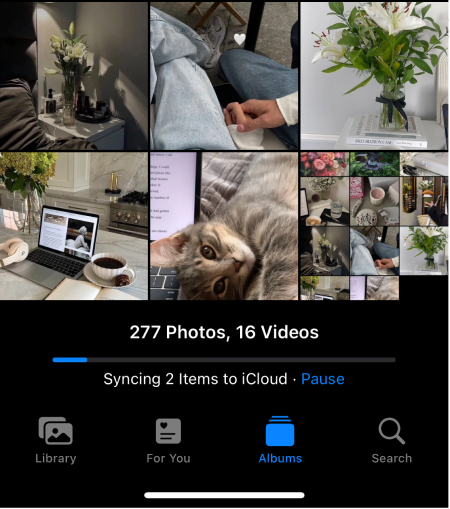
- Open the Photos app on your device.
- Tap on the “Photos” tab at the bottom of the screen to view your entire Photo library.
- Wait for a few moments to allow the app to sync your photos with iCloud.
Don’t forget to check that the photos are always syncing. How? Let’s me show you how:
- Open the Photos app on your device.
- Tap on the “Photos” tab.
- At the top of the screen, you’ll see if the Library is synced or still in progress.
Once your photos are backed up to iCloud, you can easily access them on other Apple devices.
- On iPhone, iPad, or Mac: Open the Photos app and your backed-up photos will be available in the library.
- On the Web: Go to iCloud.com and sign in with your Apple ID. Click on the “Photos” icon to view and download your backed-up photos.
Here are some additional tips to help you effectively back up your photos with iCloud:
- Keep an eye on your iCloud storage to ensure you have enough space to back up all your photos. If you run out of space you can always upgrade your iCloud plan.
- If you don’t want to use mobile data, make sure you are connected to a Wi-Fi network when backing up your photos to iCloud.
- On your iPhone or iPad, you can enable the “Optimize iPhone Storage” feature in Settings > Your Name > iCloud > Photos > “Optimize iPhone Storage.” This option will store lower-resolution versions of your photos on your device, saving storage space.
Disadvantages of iCloud
- slow backups;
- limited storage;
- limited control over backup;
Option 7: How to use iCloud Drive
iCloud Drive is Apple’s cloud storage service that allows you to store your files, including photos, documents, and more, securely in the cloud. With iCloud Drive, you can access your media from any of your Apple devices, such as iPhone, iPad, or Mac, as long as you are connected to the internet.
How to Back Up Photos with iCloud Drive?
Step 1: Set Up iCloud Drive
- Before you start, make sure that you have enough iCloud storage. You can manage your iCloud storage by going to Settings > Your Name > iCloud > Manage Storage on your iPhone.
- To back up your photos with iCloud Drive, you need to enable iCloud Photos on your device. To do this, go to Settings > Your Name > iCloud > Photos, and toggle on the “Sync this Photo” option.
Step 2: Upload Photos to iCloud Drive
- Open the Photos app on your iPhone or iPad.
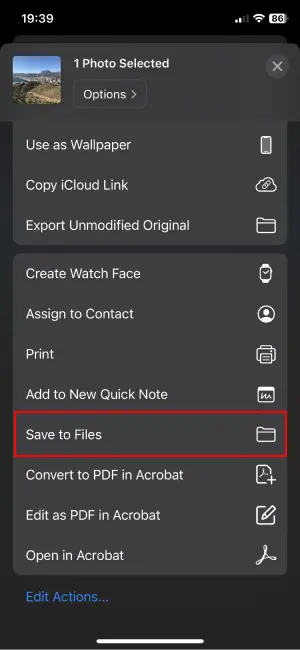
- Choose the photos you want to back up to iCloud Drive by selecting them individually or in batches. Tap the “Share” icon.
- Select the option to “Save to Files”.
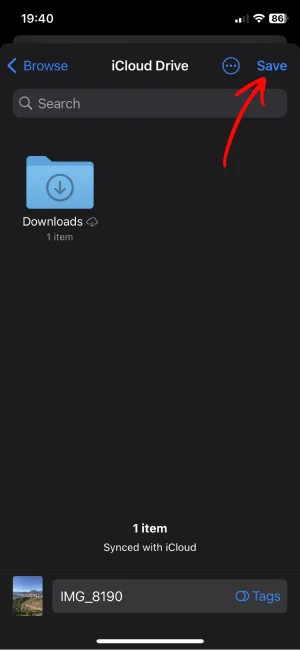
- Now “Save” to iCloud Drive.
Tips for Managing Photos on iCloud Drive
Video Quality Options for Live Photo Conversion
When backing up Live Photos to iCloud Drive, consider the video quality options available. Higher-quality videos will take up more storage space, so take it into account when saving media to your iCloud Drive.
Storage Space Considerations for Live Photo Videos
Since Live Photos consist of both images and video clips, they occupy more space compared to regular photos. Keep an eye on your iCloud storage usage and upgrade to a higher storage plan if needed to save all your Live Photos and other media files.
Disadvantages of iCloud Drive
- slow method, it takes a lot of time to save photos;
- limited storage: only 5 GB in a free plan;
- no automatic backups;
Option 8: Backup photos from iPhone to PC with Google Photos
Google Photos is a cloud-based service provided by Google. It is user friendly and helps you to store, organize, and share photos and videos. With its intelligent search functionality, automatic backup features, and powerful editing tools, Google Photos has become a good solution for those who wants to save their photos not only on iPhone.
Here’s how you can easily back up your photos using Google Photos:
- Install Google Photos App on your iPhone. Download the app from the App Store. Then open it and sign in to your Google Account.
- Once you’re logged in, go to the app’s settings, and check if the “Backup and sync” option is turned on. This will automatically back up your photos to the cloud whenever you are connected to Wi-Fi.
- After setting up the backup preferences, Google Photos will start backing up your existing photos and any new ones you capture with your device.
- Once your photos are uploaded to Google Photos, you can access and view them from any device with the Google Photos app or through a web browser by signing in to your Google account. You can also create albums, share images with friends and family, and even create collaborative photo libraries for special events or trips.
Option 9: How to backup photos from iPhone to computer via Dropbox
The last option we offer you is to use Dropbox. Dropbox is like this awesome cloud thingy where you can store and get to your files from any device with the internet. You can use it on your iPhone, iPad or computer, and everything magically syncs up. It’s perfect for organizing and keeping your photos safe, so you can get to them whenever you want. Isn’t that just super convenient?
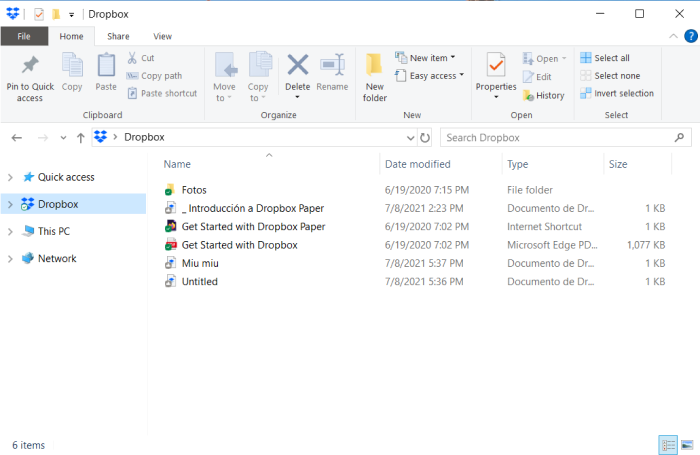
- Install Dropbox App on your PC. Sign in or Create an Account.
- After you’ve signed in, Dropbox will create a special folder on your PC called “Dropbox.” This folder is where you can conveniently store and access all your Dropbox files, including your photos.
- To save your photos to Dropbox, simply drag and drop them into the Dropbox folder on your PC. You can organize your photos into subfolders based on events, dates, or any other categorization that makes sense to you.
- Once your photos are in the Dropbox folder on your PC, they will automatically sync to the cloud. This means you can access them from any device with the Dropbox app installed, including your iPhone.
Disadvantages of Dropbox
- photos on PC sorted by date of transfer, not by date of creation;
- no album structure;
- limited free storage, only 2 GB;
- will create duplicates;
- expensive software when you buy additional storage;
- not intuitive interface;
Conclusion
So, to wrap things up, choosing the best way to back up your iPhone photos is a big deal. You have to think about how much storage you need, how fast it is to get to your photos, and how secure everything is.
We checked some of the methods and you have a few options to choose from. iCloud Photos is great if you use Apple devices because it’s all integrated. But there are also other cloud services that work across different devices, which is handy. Or you can go old school and back up your photos manually to your computer.
The important thing is to make sure you have backups in different places. This way, if something bad happens, like losing your phone or something going wrong with the software, your photos will still be safe. You don’t want to lose those special moments, right?
In the end, the best method is the one that fits your own needs and habits. It’s all about finding a balance between what works for you and knowing that your photos are always there for you when you want them. No matter which way you go, protecting your photos is like investing in keeping those priceless memories alive for years to come.