 CopyTrans Studio

Short answer: before you trade in or sell your iPhone, copy all your photos and videos to your PC and check the copy. Then make a full iPhone backup (iCloud or computer), sign out of your Apple Account so Find My is turned off, and erase the iPhone with Erase All Content and Settings. In that order. Once the iPhone is erased, anything you didn’t save is gone for good, so the photo backup comes first.
- The trade-in checklist
- Step 1: Back up your photos to your PC
- Step 2: Check the photo backup
- Step 3: Make a full iPhone backup
- Step 4: Sign out and turn off Find My
- Step 5: Erase your iPhone
- Back up iPhone before trade-in: FAQ
The trade-in checklist
Here’s everything in one place. Each step is explained below.
| Step | Why it matters | Time |
|---|---|---|
| 1. Back up photos to your PC | Your own copy, independent of iCloud | 15-60 min |
| 2. Check the photo backup | The last chance to notice something is missing | 5 min |
| 3. Full iPhone backup | Apps, messages and settings for your new iPhone | 15-60 min |
| 4. Sign out, turn off Find My | Otherwise the shop can’t accept the iPhone | 2 min |
| 5. Erase the iPhone | Removes your personal data | 5-10 min |
Step 1: Back up your photos to your PC
Why a separate photo backup, if you’re making a full backup anyway? Because a full iPhone backup can only be restored to an iPhone. You can’t open it on your PC to look at your photos. And if you use iCloud Photos, your photos aren’t even in the iCloud backup, they’re in iCloud Photos, which only lasts as long as you keep paying for the storage. A copy on your PC is yours, no matter what.
-
Download and install CopyTrans Studio. Connect your old iPhone with a cable, unlock it and tap Trust.
Download CopyTrans Studio -
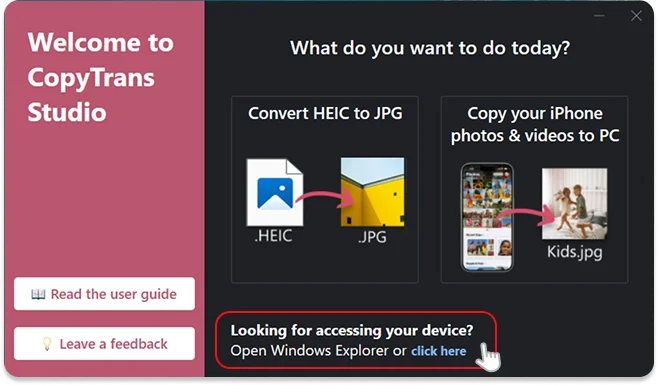
Click the CopyTrans Studio icon in the system tray, next to the clock, and open the program.
-
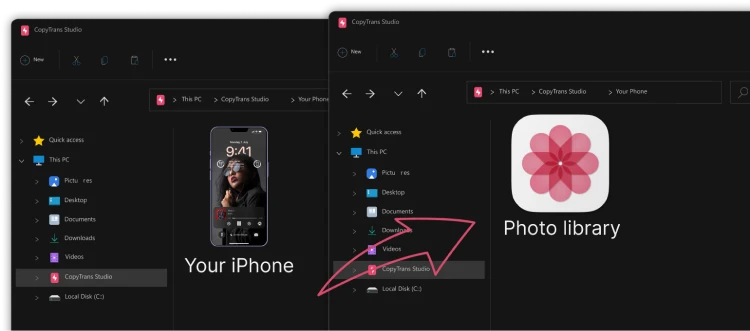
Choose the icon of your iPhone, then click Photo Library.
-
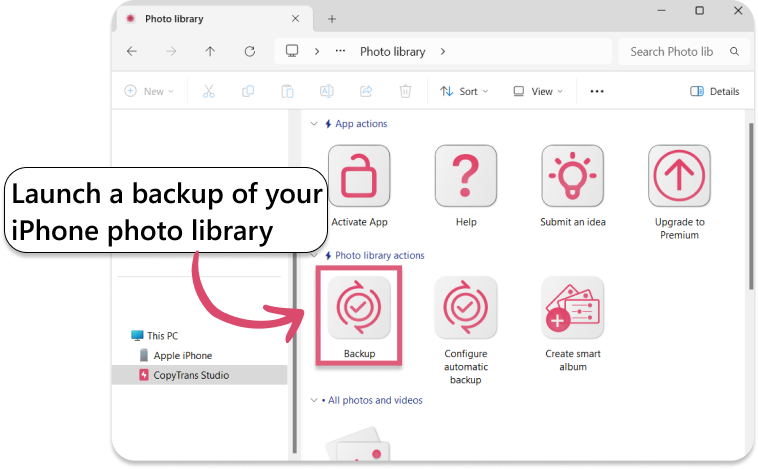
Click Back up and choose a folder on your PC or an external drive. All your photos and videos are copied there.
Using iCloud Photos with Optimize iPhone Storage? Then many full-size originals aren’t on the iPhone. Switch to Download and Keep Originals a day before, so your iPhone has time to download them.
Photos in WhatsApp and other messaging apps aren’t in your photo library unless you saved them. Here’s how to save WhatsApp photos to your PC .
Step 2: Check the photo backup
This takes five minutes, and it’s the step people regret skipping.
- Compare the number of photos and videos in the backup folder with the number at the bottom of Library in the Photos app.
- Open photos from different years, and play a few videos.
- Check your important albums and Favorites. Here’s how to save albums to your PC if you want them as separate folders.
- Copy the backup to a second place, like an external drive.
Step 3: Make a full iPhone backup
The full backup is for setting up your new iPhone with your apps, messages and settings.
With iCloud:
Go to Settings > *YOUR NAME* > iCloud > iCloud Backup.
Tap Back Up Now and wait until it’s finished. Stay on Wi-Fi.
With your PC:
Install the Apple Devices app from the Microsoft Store, or use iTunes.
Connect your iPhone, select it, and click Back Up Now. Tick Encrypt local backup if you want passwords and Health data included.
Getting the new iPhone at the same time? You can also skip the backup and use Quick Start to move everything directly from the old iPhone to the new one.
Step 4: Sign out and turn off Find My
As long as Find My is on, the iPhone is locked to your Apple Account (Activation Lock), and the shop can’t resell it.
If you have an Apple Watch, unpair it first in the Watch app.
Go to Settings > *YOUR NAME*, scroll down and tap Sign Out.
Enter your Apple Account password. This also turns off Find My.
Keep in mind: when you sign out, your iPhone may ask whether to keep a copy of your data. That’s only about the iPhone itself. Your photos in iCloud Photos stay in iCloud and aren’t affected.
Step 5: Erase your iPhone
Go to Settings > General > Transfer or Reset iPhone.
Tap Erase All Content and Settings and follow the steps.
If you use an eSIM, choose whether to keep or delete it. If your new iPhone already has your number, you can delete it.
When the iPhone shows the “Hello” screen, it’s ready for the trade-in. Take out the SIM card if you have a physical one.
Don’t delete your photos from iCloud just because you’re giving away the iPhone. Erasing the iPhone doesn’t touch iCloud. Only delete them there if you’ve moved them somewhere else and checked the copy.
Back up iPhone before trade-in
FAQ
Do I need to back up my iPhone before a trade-in?
Yes. Once the iPhone is erased, there’s no way to get your data back. Back up your photos to your PC and make a full backup for your new iPhone.
Does the shop erase the iPhone for me?
Many do, but don’t rely on it. Erase it yourself, and turn off Find My, so your data is gone before it leaves your hands.
Are my photos in the iCloud backup?
Only if iCloud Photos is off. With iCloud Photos on, they’re stored in iCloud Photos instead, not in the backup. Either way, a copy on your PC is the safest.
Can I open an iPhone backup on my PC to see my photos?
Not directly. iPhone backups are made for restoring to an iPhone. That’s why we recommend a separate photo backup in normal folders.
What if I’ve already erased the iPhone?
Check iCloud Photos on icloud.com, your iCloud or computer backups, and any photo apps like Google Photos. If the photos aren’t in any of them, they can’t be recovered.
Prepare iPhone before trade in
Final Thoughts
Before a trade-in, think “photos first”. Copy photos to your PC, check the copy, then make a full backup for your new iPhone, sign out of your Apple Account and erase the old one. It takes less than an hour, and you hand over your old iPhone knowing every photo is safe.
Download CopyTrans Studio